
Author: Marilyn Warrant
Last Update: 6/13/19
Contents
- Overview
- Comparison Table for Tasks vs. Types of Software
- The GPS Itself
- EasyGPS (PC)
- GPSBabel (PC)
- Text Editor
- GPS Visualizer
- National Geographic TOPO! ® New Mexico (PC)
- Setup
- Import GPS Data
- Export GPS Data
- Edit a Waypoint Label
- Use Text Labels for Waypoints
- Delete a Waypoint
- Add a Waypoint
- Copy a Waypoint
- List Waypoints with Data
- Draw a Track
- Split a Track
- Join Tracks
- Clean a Track – NG TOPO
- Draw an Elevation Profile and Determine Maximum and Minimum Elevations
- Determine Total Uphill/Downhill
- Determine Average Grade
- Determine Distance Along the Track
- Draw a Map
- DeLorme North America Topo 9.0 (PC)
- Setup
- Import GPS Data
- Edit a Waypoint Label
- Use Text Labels for Waypoints
- Delete a Waypoint
- Add a Waypoint
- List Waypoints with Data
- Draw a Track
- Split a Track
- Join Tracks
- Clean a Track
- Return Elevation Data to a Track
- Draw an Elevation Profile and Determine Maximum and Minimum Elevations
- Determine Total Uphill/Downhill
- Determine Average Grade
- Determine Distance Along the Track
- Draw a Map
- Add a MapNote
- Garmin BaseCamp with TOPO U.S. 24K Southwest (PC)
- Setup
- Enable Toolbars
- Import GPS Data
- Export GPS Data
- Set Color of Track
- Edit a Waypoint Label
- Delete a Waypoint
- Add a Waypoint
- Copy a Waypoint or Track
- List Waypoints with Data
- Draw a Track
- Reverse a Track
- Split a Track
- Join Tracks
- Clean a Track
- Add Elevation Data to Track File
- Draw an Elevation Profile
- Determine Maximum and Minimum Elevations
- Determine Total Uphill / Total Downhill
- Determine Average Grade
- Determine Distance Along the Track
- Draw a Map
- Geotag Photos
- Garmin BaseCamp with TOPO U.S. 24K Southwest (Mac)
- Screen Shot Instructions
- Change Maps on Your GPS Unit
- Setup
- Enable Toolbars
- Default Toolbar Symbols and Their Meaning
- Import GPS Data
- Export GPS Data
- Show Contents on Map
- Edit a Waypoint Label
- Delete a Waypoint
- Add a Waypoint
- Copy a Waypoint or Track
- List Waypoints with Data
- Draw a Track
- Reverse a Track
- Set Color of Track
- Split a Track
- Join Tracks
- Clean a Track
- Draw an Elevation Profile
- Simplify a Track
- Determine Maximum and Minimum Elevations
- Determine Total Uphill / Total Downhill
- Add Elevation Data to Track File
- Determine Average Grade
- Determine Distance Along the Track
- Draw a Map
- Map Editing for ASCHG
- IrfanView
Overview
The five primary categories of tools for working with GPS data are:
- The GPS itself
- Text editing software
- Software programs that interface between the GPS and the computer and/or perform simple transformations of data (EasyGPS and GPSBabel)
- Software programs that create and export displays of GPS data on topographic maps (mapping software) (GPS Visualizer, NG TOPO, DeLorme North America, and Garmin BaseCamp)
- Software programs that modify image output from mapping software to meet image requirements for the website (IrfanView and Google Photos, among others)
Which tools you choose to use will depend on several factors:
- Your computer operating system.
- Your comfort level for editing .gpx files with a text editor or using new software programs.
- How much money you are willing to spend on mapping or image editing software.
The objective of this Help article is to provide options for ways to obtain the data needed for a hike description for the Albuquerque Senior Centers’ Hiking Groups (ASCHG) website. Some of the tools can be used on either Mac or PC;
for example, Text Editor and GPS Visualizer (browser-based). The National Geographic TOPO and DeLorme Topo North America sections are written for Windows PC — both of these softwares have been discontinued but are retained because some of us still use them. Two versions of Garmin BaseCamp (one for PC and one for Mac) are included because the user interfaces are quite different.
Note: To avoid confusion when working with the website, it’s important to set up each software or device so that it uses the same map datum (WGS84) and the same coordinate system (degrees, decimal minutes) as the ASCHG website.
For more information about the hike description, section names and content, see How to Write a Hike Description.
Often instructions for PCs are specific as to whether a “click” is a “right click” or a “left click”. If no “right” or “left” is provided, a left click usually is intended.
Comparison Table for Tasks vs. Types of Software
| Task/Software | GPS Itself | EasyGPS | Text Editor | GPSBabel | Mapping Software |
|---|---|---|---|---|---|
| Receive data from GPS | no | yes | no | no | yes |
| Send data to GPS | no | yes | no | no | yes |
| Convert from proprietary format to .gpx | no | no | no | yes | yes |
| Edit a waypoint | yes | yes | yes | no | yes |
| Delete a waypoint | yes | yes | yes | no | yes |
| Add waypoint | yes | yes | yes | no | yes |
| Copy a waypoint | yes | yes | yes | no | yes |
| Find a street name | yes | no | no | no | yes |
| Provide a method to list waypoints with data | no | yes | yes | no | yes |
| Transform waypoints into a track | no | no | no | yes | no |
| Transform a route into a track | no | no | no | yes | no |
| Draw a track | no | no | no | no | yes |
| Reverse a track | no | no | no | yes | some |
| Split a track | no | no | yes | yes | yes |
| Join tracks | no | no | yes | yes | yes |
| Clean a track | no | no | no | no | yes |
| Simplify a track | no | no | no | yes | some |
| Determine total uphill/downhill | some | no | no | no | yes |
| Determine maximum & minimum elevations | some | no | yes | no | yes |
| Determine average grade | no | no | no | no | some |
| Provide a way to determine distance between waypoints along a track | no | no | no | no | yes |
| Draw a map showing the waypoints & track on a topo | yes | no | no | no | yes |
| Export a map | no | no | no | no | some |
Return to Contents
The GPS Itself
See Using a GPSMap 60CSx for instructions for setting up and using a Garmin GPSMap 60CSx unit or Using a GPSMap 64s for instructions for setting up and using a Garmin GPSMap 64s unit.
You can:
- Edit a waypoint label
- Delete a waypoint
- Add a waypoint
- Delete a track
The steps will depend on your GPS unit.
Return to Contents
EasyGPS (PC)
EasyGPS is a free software program for Windows. The instructions written below are based on functionality in version 5.79. This version is preferred over the most recent one (7.08 as of June 2019) because the nice “print waypoints” feature has disappeared in more recent versions.
You can obtain version 5.79 from the EasyGPS archive.
[Last Update: June 2019]Setup – EasyGPS (PC)
You’ll need to set up your GPS in EasyGPS.
Steps:
- Click on Edit →Preferences. The Preferences window pops up.
- Click on the tab My GPS Receivers.
- Click on the Add GPS button, and select your GPS manufacturer & model from the list.
- Click on Units of Measure.
- Make sure the units are set to US units (miles, feet, etc.)
- Click on My Coordinate Formats.
- Choose Lat/Lon Degrees & Minutes WGS84 (that is, degrees, decimal minutes and WGS84 datum).
Next, test the connection between the GPS and the computer.
Steps:
- Connect the USB port on the GPS to your computer using the supplied cable.
- Click on the Settings button near the bottom of the window. Select the USB port.
- Click OK.
Receive Data from GPS – EasyGPS (PC)
Steps:
- Connect your GPS to your computer via the USB connection.
- Start EasyGPS.
- Click on the Receive button.
- If you have more than one GPS, choose the one that’s connected.
- Make sure the data types you want to receive (usually waypoints and tracks) are checked.
- Click the OK button.
If you want to save the data on your hard drive, click File → Save As and choose a folder and file name.
Send Data to GPS – EasyGPS (PC)
Steps:
- Connect your GPS to your computer via the USB connection.
- Start EasyGPS.
- Click File → Open and choose the .gpx file on your hard drive that you want to use. The data should display on the EasyGPS screen.
- Click the Send button.
- Verify that the GPS has received the data from the file.
Edit a Waypoint Label – EasyGPS (PC)
While you can enter a name for a waypoint during a hike, it’s often simpler to write down the waypoint number assigned by the GPS and your preliminary waypoint name on paper during the hike and rename the label in the .gpx file later.
Steps:
- Open the waytrack file for the hike.
- Click on the little arrow next to List until Waypoints is shown.
- Right click on the waypoint you want to edit, and left click Edit Waypoint.
- Change both Label on Map and Name on GPS to the name you want to use (14 characters or less).
- Click on the OK button.
- Verify that the label name changed in the display on the right-hand part of the screen.
Delete a Waypoint – EasyGPS (PC)
Often as you’re renaming waypoints, you’ll come across ones that you don’t want to save after all.
Steps:
- Click on the little arrow next to List until Waypoints is shown.
- Double click on each listed waypoint to see it emphasized in the display on the right-hand part of the screen.
- Right click on the selected waypoint, then left click on Delete Waypoint in the drop-down menu.
Copy a Waypoint – EasyGPS (PC)
Sometimes you have a waypoint in one waytrack file that you’d like to copy to another file (e.g., the location of the Pecos Dairy Queen). If you have multiple .gpx files open, you can switch from one to another by clicking on the Window on the top menu.
Steps:
- Click on File → Open, and open the first waytrack file.
- Click on the little arrow to the right of List until Waypoints is shown.
- Click on File → Open, and open the second waytrack file.
- Click on the little arrow to the right of List until Waypoints is shown.
- Find the waypoint you want to copy in the list on the left side of the screen.
- Right click on the waypoint, left click on Copy Waypoint in the drop-down list.
- Go to the waypoints listing in the second window, right click to get the drop-down menu then left click on Paste. If you save this file, you’ve now added the waypoint to the file.
List Waypoints with Data – EasyGPS (PC)
While you can print to paper a list of waypoints from EasyGPS, you’ll need to use a round-about method to get a list that you can copy and paste into a hike description input form.
Download the PDF reDirect software from http://www.exp-systems.com/ and install it on your hard drive. This is a free software package for creating .pdf files that recognizes even unusual fonts.
In EasyGPS, the steps are:
- Select all the waypoints by left-clicking on the first one, press Shift and hold, then left-click on the last one.
- Click on the Print button on the second level menu.
- Click on another Print button on the menu of the window that opens.
- From the list of printers on your computer, select PDF reDirect, and click OK. PDF reDirect will open.
In PDF reDirect, the steps are:
- Move the cursor (a hand symbol) into the preview window at the lower right-hand part of the screen, and left click. A PDF file containing the list of waypoints will open in Adobe Acrobat. When you move your cursor over to the list of waypoints, the cursor turns into a vertical line.
- Select all the waypoints by left-clicking at the beginning of the first waypoint and moving the cursor to the end of the last waypoint.
- Press and hold Ctrl and press C on your keyboard to copy the waypoints to the clipboard.
- Paste the waypoints into the hike description data input web page or your draft hike description in a word processing file.
Here’s what an unedited list of waypoints from the Sandstone Bluffs Long Loop hike waytrack file looks like.
CARS N35 14.632 W106 52.287 6008.61 ft
FORK DOWN N35 14.755 W106 52.326 6179.71 ft
INTERSECTION N35 13.957 W106 52.548 5812.28 ft
JOIN ROAD N35 14.576 W106 53.892 5845.38 ft
MESA TOP N35 14.442 W106 52.501 6101.57 ft
PARK N35 14.703 W106 51.871 6205 ft
RAVINE N35 14.235 W106 52.395 5881.66 ft
VIEW/LUNCH N35 14.773 W106 53.658 5924.24 ft
You’ll need to do some editing of this list to get the waypoints in the format requested for the hike description, but it’s a lot easier than typing the latitude and longitude characters and then checking them for accuracy.
Delete a Track – EasyGPS (PC)
The tracks you received from your GPS may include a track you recorded on another date, a track downloaded from the website, the active log, and the track you just recorded. You probably want to delete some of those.
Steps:
- Click on the little arrow next to List until Tracks is shown.
- Double click on each listed track to see it emphasized in the display on the right-hand part of the screen.
- Right click to select a track to delete, then left click on Delete Track in the drop-down menu. Confirm that you really do want to delete this track by clicking on Delete in the popup window.
Copy a Track – EasyGPS (PC)
Follow the same process you used for copying waypoints, but make sure Tracks are shown under List.
Return to Contents
GPSBabel
GPSBabel is a free software program for Windows, Mac, and Linux-based
operating systems. Download the current version of GPSBabel for your operating system from
their Home Page. This Help section is based on version 1.5.4 for PC, and addresses only the features we commonly use.
Convert from Proprietary Format to .gpx – GPSBabel
You can convert to .gpx from a number of proprietary formats, such as the .tpo file format
used by National Geographic TOPO!.
Steps:
- Select the Input format.
- Select the file on your hard drive that you want to convert.
- Change the Output format to GPX XML (.gpx).
- Select the directory and filename for the converted file
(usually the original file name + .gpx in the original folder). - Under What? check Waypoints and Tracks.
- Click on the let’s go button. The converted file
will be saved in the specified location.
Reverse a Track – GPSBabel
This feature can be helpful if you’re combining track segments into a new track.
Steps:
- Change the input format to GPX XML (.gpx).
- Select the .gpx file that you want to reverse.
- Change the output format to GPX XML (.gpx).
- Select the directory and filename for the reversed file
(such as the original file name + _rev +.gpx in the original
folder). - Under What? check Tracks.
- Click the Filter button.
- Under Routes & Tracks, check Reverse.
- Click the OK button.
- Click on the let’s go button. The file with the
reversed track will be saved in the specified location. - To avoid filtering the next file you work on, go back into
Filter, uncheck any boxes, and click the OK button.
Simplify a Track – GPSBabel
Some of our hike leaders still use a Garmin GPSMap 60Csx, which will not import a named hike .gpx file if it has more than 500 trackpoints, so we ask that tracks uploaded onto the ASCHG website have no more than 500 trackpoints. If you’ve joined several tracks into one, have a newer GPS, or have only the active log recorded for a hike, you’ll need to simplify the track to reduce the number of trackpoints. (Just don’t go overboard and reduce the number significantly below 500.)
Steps:
- Set the input format to GPX XML (.gpx).
- Select the .gpx file that you want to simplify.
- Set the output format to GPX XML (.gpx).
- Select the directory and filename for the simplified file (such as the original file name + _simp +.gpx in the original folder).
- Under What? check Tracks.
- Click the Filter button.
- Under Routes & Tracks, check Simplify, and for limit to xxx trackpoints choose 500.
- Click the OK button.
- Click on the let’s go button. The file with the simplified track will be saved in the specified location.
- To avoid filtering the next file you work on, go back into Filter, uncheck any boxes, and click the OK button.
Return to Contents
Text Editor
A .gpx file that you export from your GPS is just a type of text file. You can use any plain text editing program (an example is WordPad for Windows) to edit the .gpx file. The first thing you need to do is to get comfortable with the tags used in .gpx files. The most important ones for us are:
- tags that identify the start and end of a waypoint
- tags that identify a waypoint label name
- tags that identify a waypoint symbol
- tags that identify the start and end of a track
- tags that identify a piece of the track (a trackpoint)
- tags that identify a track name
You might also be surprised at how the coordinates, elevation, and time of day information appear.
Tags in .gpx Files – Text Editor
A .gpx file must have several lines at the start, called metadata, and must end with a </gpx> tag. If you need to create a separate .gpx file, be sure to copy the starting metadata and ending tag from another .gpx file and insert your information in the middle. If there are waypoints included in the file, the waypoints are listed first.
A waypoint in a .gpx file has the form:
<name>PARK</name>
</wpt>
The characters <wpt start and </wpt> end the waypoint data. The variables lat and lon are the latitude and longitude, respectively, in decimal degrees. The waypoint label is contained within the <name> and </name> tags.
A track in a .gpx file has the form:
<name>RioRanchoBadlandsWayTrack_DMDM</name>
<trkseg>
<trkpt lat=35.24289951659739 lon=-106.898277215659618>
<ele>1781.4765625</ele>
</trkpt>
<trkpt lat=35.242996076121926 lon=-106.898233294487>
<ele>1782.6015625</ele>
</trkpt>
</trkseg>
</trk>
The <trk> and </trk> tags start and end the track data.
<trkseg> and </trkseg> allow there to be more than
one segment in a track. The symbol <trkpt starts and </trkpt> ends the trackpoint data. Similar to waypoints, the lat and lon are the latitude and longitude, respectively, of a trackpoint which was created internally by the GPS as you recorded the track.
The <ele> and </ele> tags start and end the elevation data for a trackpoint. The standard unit for elevations is meters.
If the track contains time of day information (as in an active log for older GPS units), it will be be in Coordinated Universal Time (UTC).
See https://en.wikipedia.org/wiki/GPS_Exchange_Format for more information.
Edit a Waypoint Label – Text Editor
Steps:
- Open the .gpx file in the text editor.
- Find the waypoint name you want to change. (You can use Edit → Find.)
- Select the text between the <name> and </name> tags to be changed.
- Type in the new waypoint label text.
- Save the file.
Delete a Waypoint – Text Editor
Steps:
- Open the .gpx file in the text editor.
- Find the waypoint name you want to delete. (You can use Edit → Find.)
- Select the text starting with <wpt and ending with </wpt> that contains the name you want to delete.
- Delete that text.
- Save the file.
Add a Waypoint – Text Editor
If you know the coordinates of a waypoint in decimal degrees, you can add it to your file. You can get this information from EasyGPS or mapping software programs by changing your GPS preference to decimal degrees (or perform the conversion yourself).
Steps:
- Open the .gpx file in the text editor.
- At the end of the waypoints listing (for convenience), copy all of the text associated with the last waypoint.
- Change the waypoint coordinates to the latitude and longitude values (must be in decimal degrees) of your waypoint.
- Change the waypoint name to the name of your waypoint.
- Delete any open lines.
- Save the file.
Copy a Waypoint – Text Editor
Steps:
- Open the file containing the waypoint.
- Open the file you want to copy the waypoint into.
- Copy all of the text associated with the waypoint from the first file.
- Paste all of the text associated with the waypoint into the second file.
- Save the file.
Delete a Track – Text Editor
Steps:
- Open the .gpx file in the text editor.
- If the track has been named, find the track name you want to delete. You can use Edit → Find.
- Select the text starting with <trk> and ending with </trk> that contains the track you want to delete.
- Delete that text.
- Save the file.
Split a Track – Text Editor
You can split a track into two tracks (each going in the same direction as the original track).
Steps:
- Make a copy of the .gpx file for the original track, change its name, and use the copy.
- Open a new text file.
- Copy the starting metadata from the copy of the original file.
- Decide the coordinates of the trackpoint where you are going to split the track. You may use GPS Visualizer or other mapping software, waypoints, or coordinates you’ve saved on your GPS to make this determination.
- Starting with the first trackpoint, copy the trackpoints up to the trackpoint at which you want to split the track.
- Paste the trackpoints into the new text file after the metadata.
- Copy the ending tag (or tags if you have a trkseg tag) from the copy of the original file.
- Delete any open lines in the file.
- Save and close the new file. This is the first track.
- Delete any open lines in the original file.
- Save and close what remains from the the copy of the original file. This is the second track.
Join Tracks – Text Editor
You can join two tracks to make one track. Just make sure that each track is going in the direction that you want for the joined track. Use GPSBabel if you need to reverse the direction of a track. Also, you need to know which track starts at the end of the other track (here called the second track).
Steps:
- Make a copy of the first track .gpx file, change its name, and use the copy.
- Open the second track.
- Copy all of the trackpoints from the second file.
- Paste all of the trackpoints from the second file at the end of the trackpoints from the first file.
- Save the file with a new name. You now have a file of one track consisting of the two pieces.
Often the track resulting from joining two or more tracks together will have more than 500 trackpoints (the maximum for some GPS units). To keep the important features of the track but reduce the number of trackpoints, use the GPSBabel Simplify option.
Return to Contents
GPS Visualizer
GPS Visualizer is a free program that runs online in your Web browser. To use the program, go to http://www.gpsvisualizer.com/.
[Last Update: June 2019]One way to use GPS Visualizer is to create a map from an existing waytrack file. The second way is to take advantage of the different backgrounds to create a waytrack for an exploratory hike. We’ll address the second way at the end of this section.
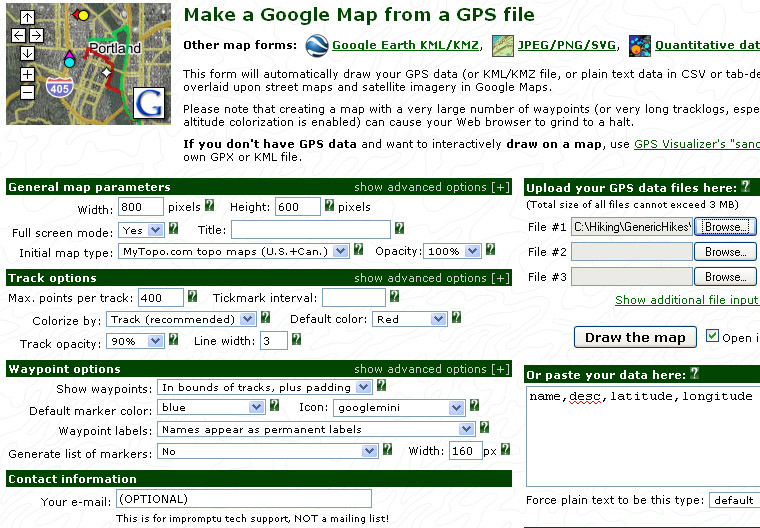
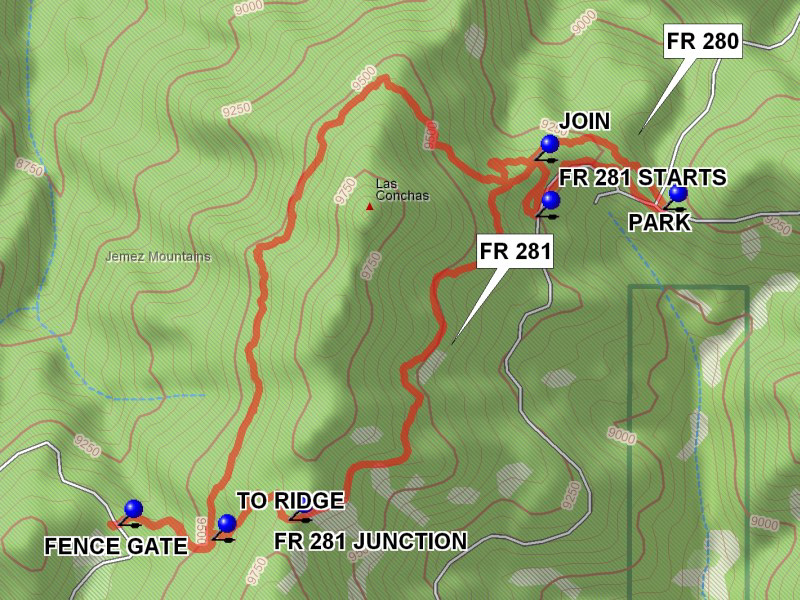
Draw a Map – GPS Visualizer
Steps:
- From the GPS Visualizer Home Page, click on Make a Map near the top of the screen.
- Depending on whether you expect the map to look better vertical or horizontal set the dimensions as 600×800 pixels or 800×600 pixels, respectively.
- Set the Full screen mode option to Yes.
- Select Initial map type to one of the topo choices, such as USGS topo.
- Set the Units to U.S.
- Under Track options, set the Default color of the track to red (the convention for our hike descriptions). You may have to go back to EasyGPS and set the track color and width.
- Set the Default color of the waypoints to blue.
- Under Waypoint Options, for Show waypoints, choose In bounds of tracks, plus padding (or All), and for Waypoint Labels, choose Names appear as permanent labels. Set the Label color to black and the Background to white.
- Leave all the other options at their starting values.
- On the right-hand side of the screen, under Upload your GPS data files here, click on the Choose File button for File #1.
- Find the location on your hard drive of the .gpx file you want to map, and click Open. The file name will appear in the box next to File #1.
- Click on the green button Draw the map just below.
- The map will open in a new window. Google is now asking you to enter a Google Maps API key. (As of 6/19, you can close the boxes where Google inserts its information and save the map without the extra stuff.)
- For a short period of time, the map can be viewed or downloaded by clicking on the view or download links.
- Click on the view link. It will be an interactive .html file, not a .jpg (picture) file.
- Zoom in or zoom out using the + and – boxes on the upper left of the screen, or right-click on the map and drag it up and down or side to side to get the whole track shown and positioned evenly on the screen.
- You can also change the image background if you don’t like the one you started with.
- To make a .jpg file, load the image onto the clipboard (for a PC by holding down the Alt key and at the same time pressing the PrtScn key on your keyboard).
- Start an image editing software program.
- Crop, resize, and save the map image.
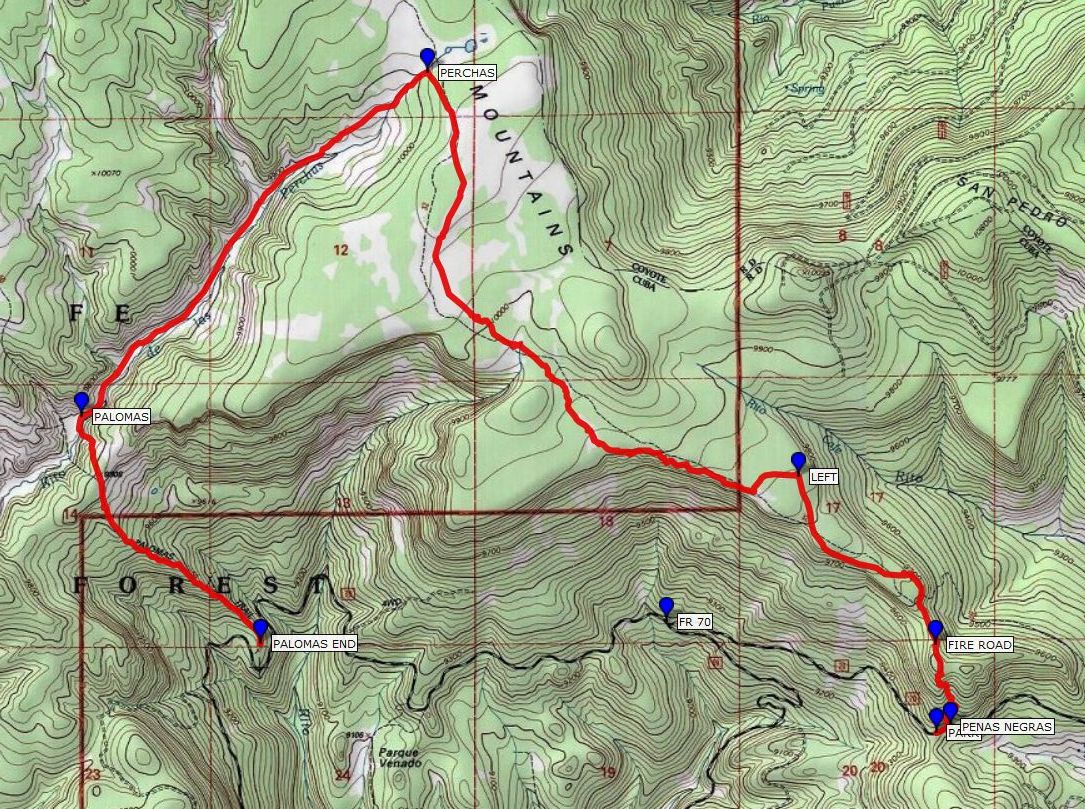
What you’re after is a JPEG image with file size no larger than 300 KB. You should be able to get something like the image below.
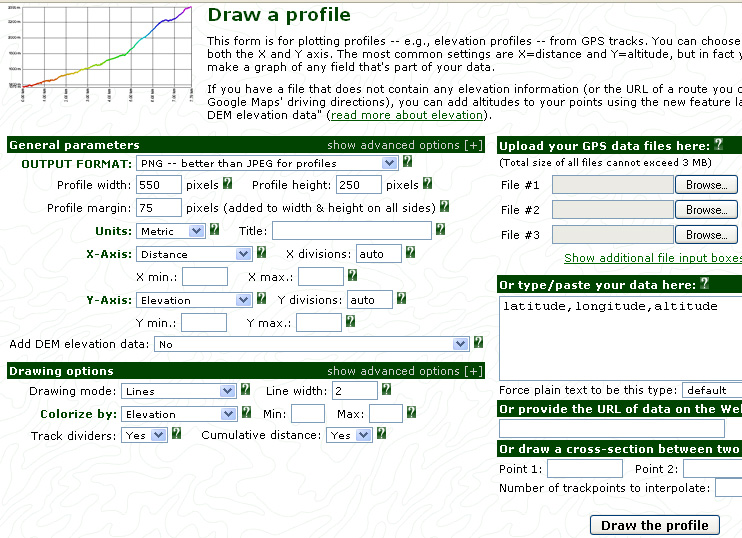
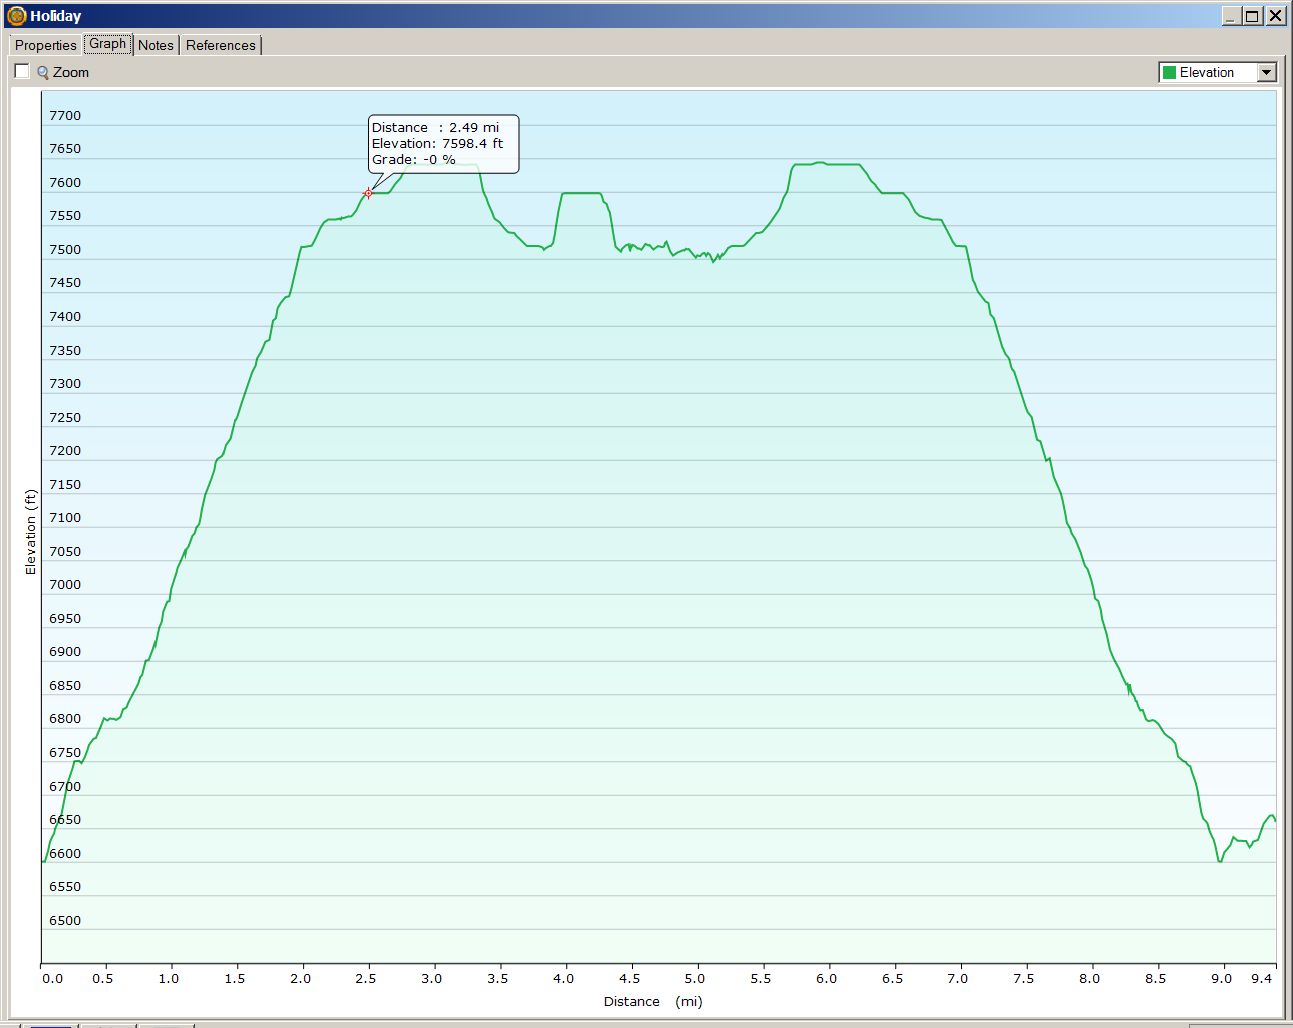
Draw an Elevation Profile and Determine Maximum and Minimum Elevations – GPS Visualizer
The elevation profile is a nice addition to the hike description’s supplemental page.
-
- Click on Make a Profile near the top of the GPS Visualizer Home Page. A Draw a Profile page comes up.
- Choose Units as U.S. (to get feet).
Choose Profile width as 600, Profile height as 300. (Change these later if you wish.)
-
- If you’re going to save the elevation profile to post it on the hike’s supplemental page, add a Title using the hike name.
- If the .gpx file includes elevation data, you can use that; for Add DEM elevation data, choose the default of No. If the .gpx file does not include elevation data or the track has a lot of jitter, select USGS NED1 as the option (as we did for this example).
- For Track/line options, for Cumulative distance choose Yes, and for Include waypoints, if possible, choose Yes, with vertical labels.
- Under Upload your GPS data files here, click the Choose File button next to File #1 and select the file from your hard drive.
- Under the Draw the profile button, leave Open in new window checked. Click on the green Draw the Profile button.
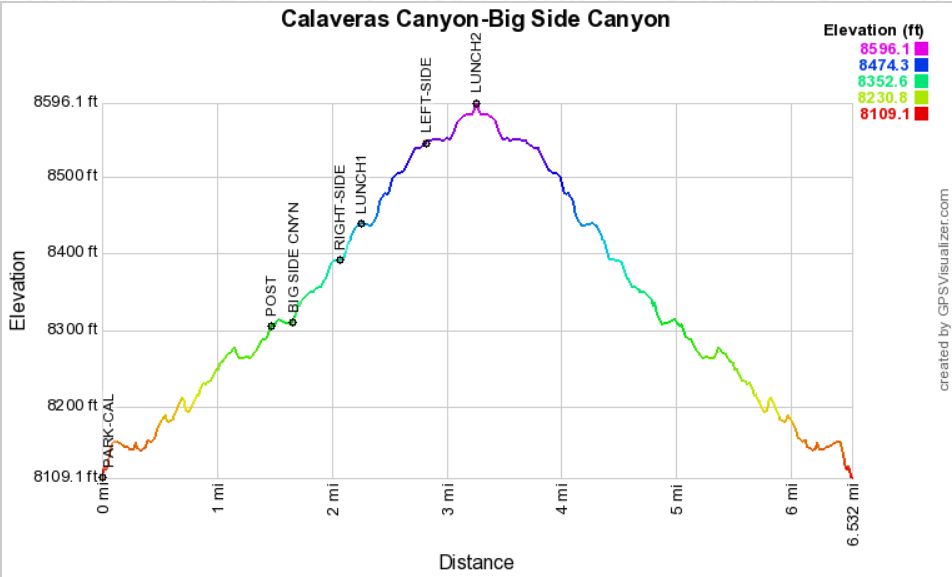
- The elevation profile appears. The maximum elevation is the largest value shown on the elevation axis, while the minimum
elevation is the smallest value shown. The hike distance in miles will be listed at the lower right side. - While GPS Visualizer gives you options to view or download the elevation profile file, it’s OK just to make a screenshot and process the image in your image editing program.
Determine Distance Along the Track – GPS Visualizer
You can use the elevation profile above to estimate the distance of each waypoint along the track from the starting location. Increase the width and/or height of the elevation profile if necessary.
Add Elevation Data to Track File – GPS Visualizer
Many of the track files posted on the website do not include elevation data. GPS Visualizer can add elevation data to the track file using a Digital Elevation Model (DEM).
Steps:
- Click on Convert a File on the GPS Visualizer Home Page.
- For Output format, choose GPX as the
- For Upload your files here, click on the Choose Files button next to File #1 and locate the track file on your hard drive.
- For Add DEM elevation data, choose USGS NED1.
- Click on the green Convert button.
- In the new window that opens, click on the Click to download link to download the output file
- Save it on your hard drive.
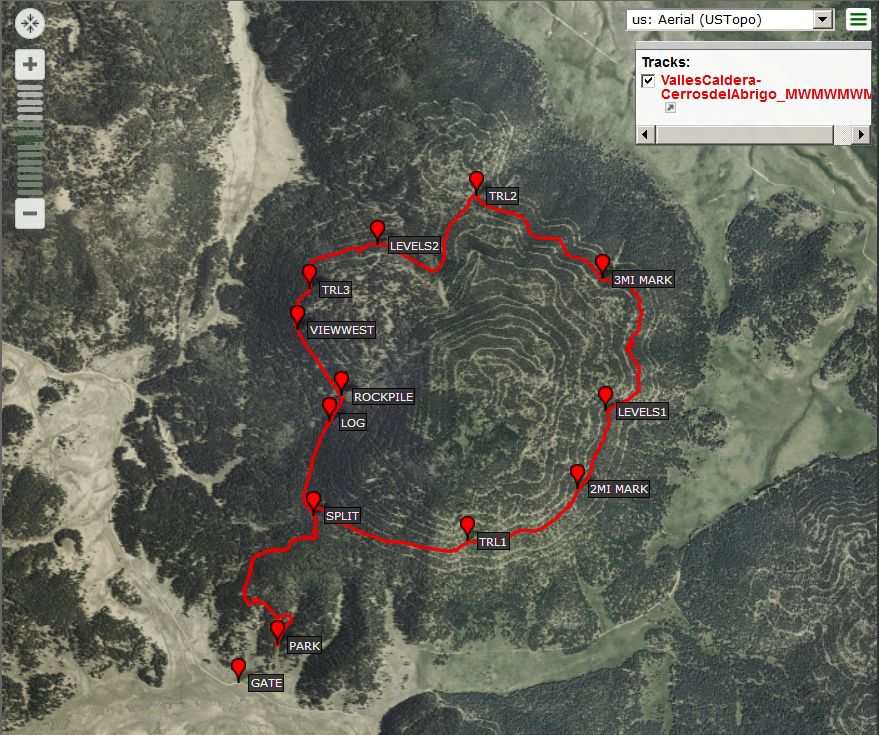
An Aerial Imagery View – GPS Visualizer
Once you’ve imported a waytrack file into GPS Visualizer, you can toggle between different views of the data. We’ve been talking about the topo view, but you can also look at several different aerial views that show roads as well as terrain features.
The following is an example of the Cerros del Abrigo hike in the Valles Caldera. You wouldn’t know it from the ground, but the hill has a web of old logging roads which are connected only at a few locations, which is clear from the aerial view.
Locate Street Names – GPS Visualizer
If your trailhead is near a populated area, you might want to refer to street names in the trailhead directions.
Choose the background option for OpenStreetMap, and zoom in. You’ll find at least the major street names.
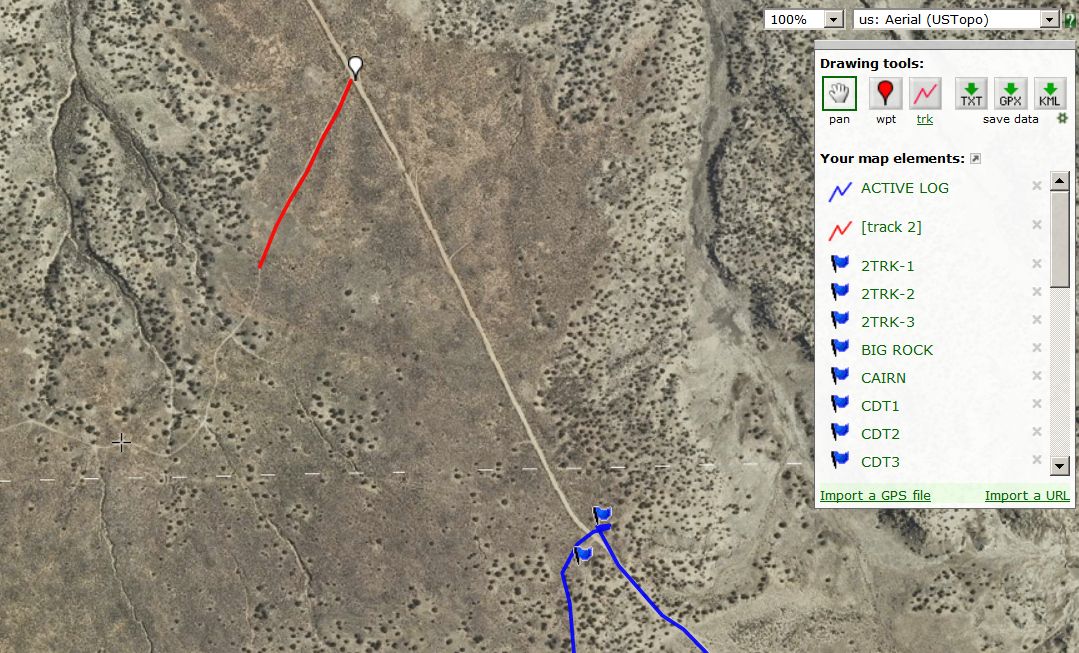
Draw Tracks and Create Waypoints on a Map – GPS Visualizer
Now it’s time to talk about developing an exploratory hike using GPS Visualizer. You can draw a track and create waypoints on the background of your choice, and switch backgrounds where needed.
Steps:
-
- Click on Draw on a Map. This will take you to GPS Visualizer’s sandbox.
- To get to the desired location, some options are:
-
-
- If you know the starting coordinates, enter them. (You can copy and paste coordinates from the Waypoints List in a hike description.)
- The cursor turns into a pan (hand symbol). Zoom in using the navigation tools in the upper left part of the screen and use the pan to move the map.
- Click on Import a GPS file, click on Choose Files then click on Import to add a track from one of our hikes near the area of interest.
-
- Change the default background shown in the upper right-hand corner of the screen to one of the topo options. In a topo background, some of the trails are indicated by dashed lines, as they are on paper topo maps (but may not be that accurate). Sometimes you’ll want to switch backgrounds from time to time, for example, to a Google Earth-type view that shows old roads.
- To add a waypoint, first click on the wpt symbol in the upper right-hand part of the screen, then click on the map where you want the symbol to appear.
- To add a track, first click on the trk button, then click along where you want the track to go. The software connects your individual clicks for you. When you’ve finished drawing the track, double-click on the last point to end the track.
- You can save the results as a .gpx file by clicking on the GPX button, then on the filename, then Save File. The name will be in the form of a string of numbers + .gpx. Rename it as you wish.
You can work with this .gpx file as you would one recorded by a GPS.
Here’s an example of an aerial view showing an old road to the north of the current La Lena South hike where I’ve added a starting waypoint and part of a track that follows an old road.
National Geographic TOPO! ® New Mexico (PC)
National Geographic TOPO!® New Mexico (NG TOPO) is one of the mapping software products. One drawback to working with this software is that files are saved in a proprietary (.tpo) format. However, by using GPSBabel, you can easily convert a .tpo file to a .gpx file.
This software is no longer being sold, but I still use it when waypoints are close together and their labels overlap. One significant benefit of this software is that you have the option to create text labels for waypoints, to choose the font and style for the text in the labels, and to move the labels so that they do not overlap.
The instructions written below are based on functionality in version 4.6.0. Note: There is no undo button, so save your work frequently.
[Last Update: June 2019]Setup – NG TOPO (PC)
Steps:
- On the top menu, left click on View, then Preferences and Settings.
- For Units → Coordinates, choose Degrees and Decimal Minutes.
- For Units → Distance, choose Miles.
- For Units → Elevation, choose Feet above mean sea level.
- For GPS → Receiver Type, identify the make and model of
your GPS and set Max Size of Waypoint Name to 14. - For GPS → Connection Setting, select your type of connection (serial or USB). Here you can verify that your GPS can connect with NG TOPO.
- For GPS → Waypoint Display, select Waypoint Display → Show
Waypoints, Waypoint Label Display → Show Name Only, and Waypoint Label Backdrops → Backdrops On (sets a white background behind the waypoint name). - For Shaded Relief, choose Normal.
Import GPS Data – NG TOPO (PC)
While you can also import data directly from your GPS, these instructions are for importing data already saved to a .gpx file.
Steps:
- From the top menu, left click on Handhelds then on Import (from GPS or .txt) Wizard.
- Select In a .gpx file and left click on the Next button.
- Find the file you want to import on your hard drive (you may have downloaded it from the website or recorded it earlier).
- Highlight the file, then click the Open button.
- Usually you will want to import the waypoints and the track as a freehand route.
- Click Finish, then OK. The waypoints will be displayed at the bottom of the screen.
- To see the track and waypoints on a topo map, double click on any of the waypoints. If you haven’t imported waypoints, double click on the waypoint 001 that NG TOPO adds at the beginning of the track. You’ll usually want to delete that waypoint now.
Export GPS Data – NG TOPO (PC)
Your only choice for getting data out of NG TOPO is to save a .tpo file. No elevation data will be exported. Convert the .tpo file to a .gpx file using GPSBabel.
Edit a Waypoint Label – NG TOPO (PC)
Steps:
- Click on the waypoint you want to edit to highlight it.
- Right click to get a menu of options.
- Left click on Properties. You’ll get the TOPO! Waypoint Editor.
- Select the waypoint Name, and type in the name you want it to have. (Use all capital letters for the ASCHG website.)
- Left click on OK.
Use Text Labels for Waypoints – NG TOPO (PC)
Even with the backdrop on, the labels still may not be legible when the image is posted on the website. This can often occur for a shuttle hike or a long in-out hike. Or you may find that the waypoint labels for some nearby waypoints overlap so that none of them is legible. NG TOPO has a text label option that can meet your needs for a legible waypoint label.
Steps:
- Open the NG TOPO file that contains the map information you want to display.
- Go to View → Preferences and Settings. Choose GPS from the left-hand side menu in the pop-up window, then Waypoint Display on the right-hand side.
- Under Waypoint Display, choose Show Waypoints.
- Under Waypoint Label Display, choose Hide Waypoint Labels. You now have little blue waypoint diamonds, but no labels.
- For each of the waypoints, click on the blue diamond in the top menu, then move your mouse cursor so that it touches the waypoint. Up will come a white box containing text including the waypoint name and its coordinates.
- Right click, then choose Create Text Label. The label is displayed (the waypoint name, plus the coordinates).
- To edit the label, click on a different tool in the top menu (such as the zoom tool), then right-click again on the text box. You can edit out the parts of the text you don’t want (usually the coordinates). You can also modify the style (font size, color, bold, etc.). Try out a couple of combinations, until you find one you like. Then name and save the style, and click on the little box for Use this style as the default for new text labels. If you’ve already created some text labels and don’t want to have to redo them, click on Modify Style button, then click on the box that says Apply changes to all text labels currently using this style.
- When you move your cursor to touch the text box, you should see a little hand. Move the text label where you want it by left-clicking and dragging the box. This is handy if there are several nearby waypoints whose labels would otherwise overlap.
- Continue on through all of the waypoints.
Name and save the .tpo file at this point (with the actual waypoint labels hidden) so that you can modify it later rather than having to do it all over again. Create the map. After you’re finished, reset the GPS → Waypoints Display to show the waypoint labels so that they are visible the next time you use NG TOPO.
If you use GPSBabel to convert this .tpo file to a .gpx file, you’ll get a waypoints list that includes things like TEXT1 (not the text you added). Delete those before saving the waytrack file.
Delete a Waypoint- NG TOPO (PC)
Steps:
- Right click on the waypoint name.
- In the popup menu, left click on Delete, then on OK. The waypoint is deleted both from the waypoints list and from the topo map.
Add a Waypoint – NG TOPO (PC)
Steps:
- Click on the blue diamond on the tools menu at the top of the page. A little box should appear around it. The cursor becomes a cross of dashed lines.
- Move the center of the cross to the location where you want to add the waypoint, and left click. The TOPO! Waypoint Editor pops up.
- Enter a name for the new waypoint, and click OK.
Copy a Waypoint – NG TOPO (PC)
Open two instances of NG TOPO. The first file will be the file that already contains the waypoint.
In the first file:
- In the waypoints list, right click on the waypoint you want to copy.
- Left click on Copy.
In the second file:
- If the waypoints list is not displayed, left click on View and left click on GPS Waypoint List. The waypoints list should appear at the bottom of the screen.
- Right click in the waypoints list area.
- Left click on Paste.
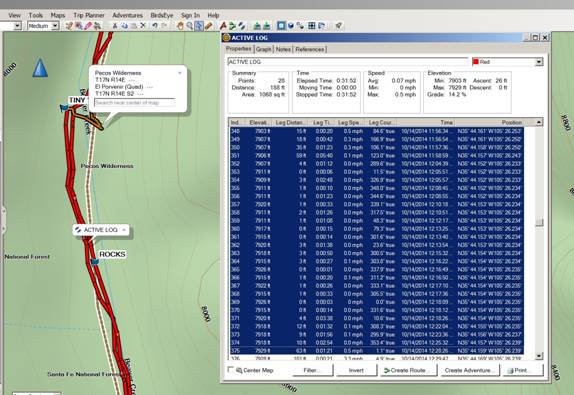
List Waypoints with Data – NG TOPO (PC)
The waypoints in the hike description Waypoints list are expected to be in the following format:
The coordinates are expressed as degrees, decimal minutes.
You can get this data out of NG TOPO with a little editing.
Steps:
- Set the coordinates that NG TOPO will display to degrees, decimal minutes by selecting View → Units → Coordinates, then click on the open circle next to Degrees and Decimal Minutes. Click OK.
- Be sure that View → GPS Waypoints List has been selected.
- Left-click on the first waypoint. The entire line should turn blue.
- Hold down the Shift key, and click on the last waypoint. All of the waypoint lines should turn blue.
- Right-click and select Copy.
- In a fresh word processing window, right-click, then left-click and select Paste.
- The waypoints will have the format:
- Edit each waypoint to look like the PARK-ALT sample above. The first coordinate listed is the latitude (degrees, minutes) and the second coordinate is the longitude (degrees, minutes). The result would look like:
Draw a Track – NG TOPO (PC)
Steps:
- Click on the pencil & ruler icon.
- Left-click on the place on the map where you want to start drawing.
- Release the click button, and move the mouse to create a colored path.
- When you’re through drawing, right-click. Name the track or just click the OK button to end.
- Click on a different icon to avoid drawing more tracks on the map unintentionally.
You can copy and paste this track piece into another NG TOPO file, or save it for later.
Split a Track – NG TOPO (PC)
Steps:
- Open the waytrack file. The cursor should look like a hand when you move it near the track.
- Left-click on the point where you want to split the track. If the track is an in-out hike, you’ll need to split at the turn-around location of the original hike.
- Right-click, then in the box that comes up, click on the Split in 2 button.
- Move the cursor over the track again, and verify that the length is now half the original value.
- Right-click on the track, then choose Delete. You now have a one-way track.
- To see which direction your one-way track is going, right-click and choose Build Profile.
- If the profile goes in the correct direction, you’re through. If not, save the .tpo file, and go to Reverse a Track – GPSBabel.
Join Tracks – NG TOPO (PC)
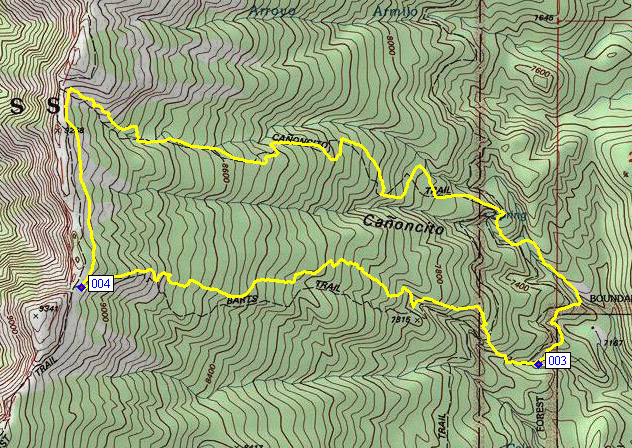
You can create a new hike by joining other tracks together. One example is creating a loop hike from tracks posted on Mike Coltrin’s website using Crest Trail (south portion), Canoncito, and Bart’s Trails. (Coltrin’s tracks are all one-way, starting from the downhill end.)
It’s a good idea to save the NG TOPO project at each stage in case you need to repeat a step.
Steps:
-
-
- Open NG TOPO, and import the Crest Trail (south portion) track.
- Establish the direction of the track by right-clicking on the track, building the profile, and clicking along the track shown on the elevation profile. If the track is in the correct direction, use it as is. If the track
goes the other direction, reverse it (see Reverse a Track – GPSBabel), then import again. - Split the track and delete the outside parts so that the remaining track lies in between the Canoncito and Bart’s trails as shown on the topo map in NG TOPO.
- To change the color of the remaining track to a different color from the default, right-click on the track, uncheck Use this style as the default for new routes, and select a different color than the one currently displayed. You now have the second part of the track that you want.
-
- For segment 1, import the Canoncito track into the current NG TOPO project.
- Change the Canoncito track color to a different color from the default or the Crest Trail segment.
- For segment 3, reverse the track for Bart’s Trail (see Reverse a Track – GPSBabel), and import it into the current NG TOPO project file. You now have a screen showing the three track segments, of three different colors.
- Click the pencil & ruler icon. Starting at the end of segment 1 (Canoncito), draw a line that just overlaps the start of segment 2 (Crest Trail). Left-click to end the track.
- You should be asked – Would you like to join this route to the route with distance xxx miles?
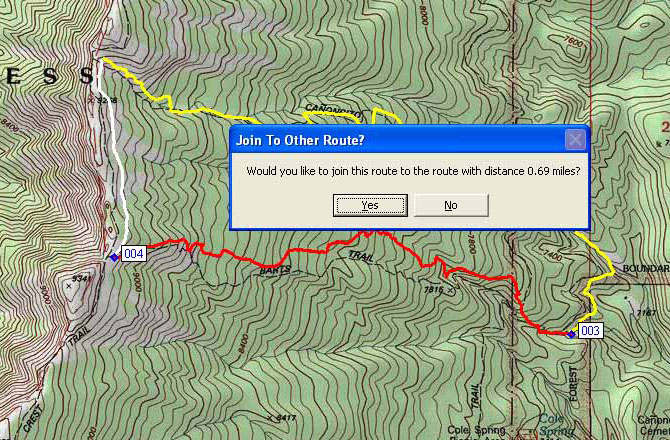
-
- Click Yes, and the color of segment 2 should become the same color as segment 1 (they now are one track).
- Starting at the end of the new track, draw a line that just overlaps the start of segment 3 (Bart’s Trail reversed). Left-click to stop drawing.
- Again, you should be asked – Would you like to join this route to the route with distance yyy miles?
- Click Yes, and the color of all of the parts should become the same. If colors don’t change when you think you’ve joined parts, check that your parts are going in the same direction by looking at an elevation profile.
-
- Finally, change the color of the resulting track to red (the default for the ASCHG website).
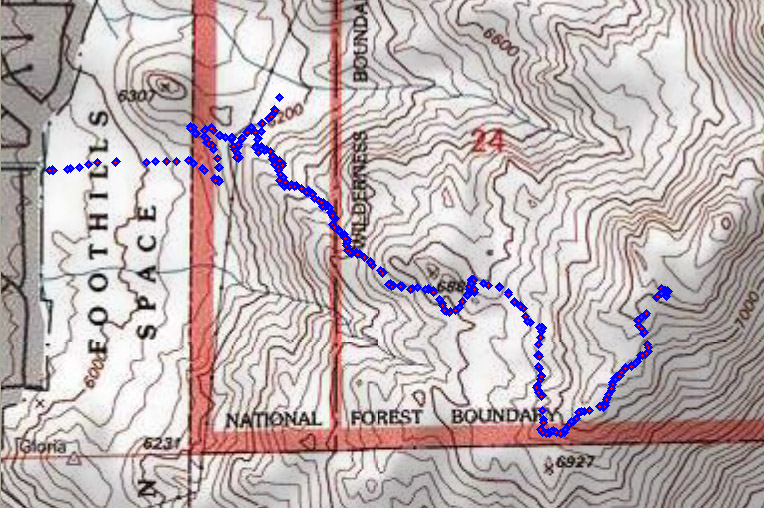
Clean a Track – NG TOPO (PC)
You might have taken a wrong turn somewhere or recorded trackpoints during lunch that show artificial distance and elevation changes. You don’t want these to remain on the finished track. You can delete those trackpoints. You’ll need to use GPSBabel and EasyGPS at some of the steps.
Steps:
-
- Import the track into NG TOPO as waypoints (NOT as a freehand route).
- View → Preferences → GPS → Waypoints Display → Hide Waypoint Labels to turn off waypoint labels.
- Right-click on the screen, select Magnify Map, and Magnify 200% (or more).
- Move a problem waypoint by selecting the waypoint tool, right-clicking on the waypoint, and dragging it to the desired position.
- Delete a waypoint by selecting the waypoint tool, left-clicking, then selecting Delete from the menu. In this example, we deviated from the intended track around the 6200 ft elevation contour.
- Continue until you’ve finished cleaning up the track.
- Make sure View GPS Waypoints list is selected. You should see the waypoint labels (all numbers) at the bottom of the screen.
- At the lower left part of the screen, find a Waypoints folder.
- Right-click on the folder, choose Export, then To a GPX file.
- Click Next, then Finish, name the file, and choose where you want to save it.
- Convert the trackpoints back into a track in GPSBabel by selecting Filter, then choose Transform → Waypoints → Tracks. The result will be the trackpoints plus a track.
- Open EasyGPS, delete the trackpoints (as waypoints), name and save the file, and you’re left with the cleaned-up track.
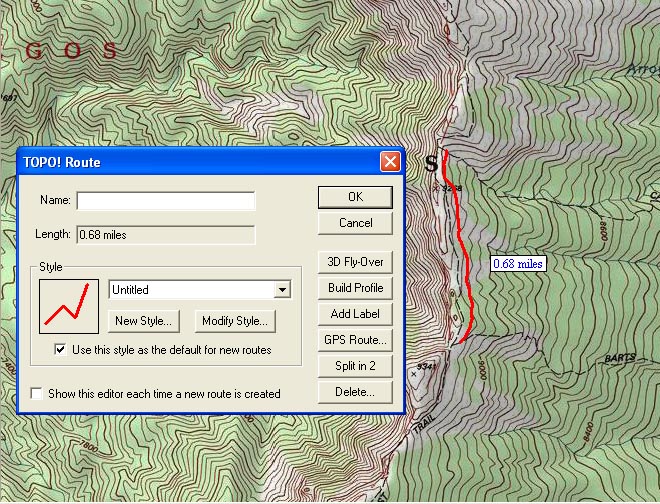
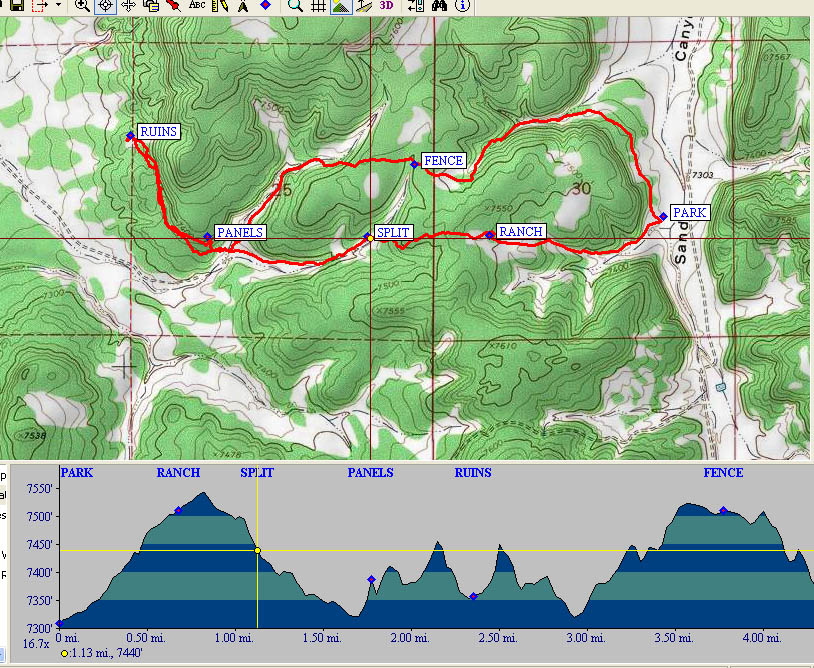
Draw an Elevation Profile and Determine Maximum and Minimum Elevations – NG TOPO (PC)
Steps:
- Right-click on the track. The TOPO! Route window pops up.
- Left-click on Build Profile. The waypoints list at the bottom of the screen is replaced by the elevation profile.
- Move the cursor towards the boundary with the profile until the cursor turns into a double headed arrow with two short lines in the middle.
- Click on the double headed arrow and drag the boundary upwards, expanding the elevation axis.
- If you wish, save the elevation profile by left-clicking on File → Save Profile.
- Move the cursor (now yellow cross-hairs) along the elevation profile. The elevation of the center of the cross-hairs is displayed at the lower left-hand side of the screen, along with its coordinates.
- Read off the minimum and maximum elevations.
Determine Total Uphill/Downhill – NG TOPO (PC)
Steps:
- Right-click on the track. The TOPO! Route window pops up.
- Left-click on Build Profile.
The total uphill value is equal to the positive Gain value at the lower right-hand corner of the elevation profile. The total downhill value is equal to the negative Gain value.
Determine Average Grade – NG TOPO (PC)
Steps:
- Right-click on the track. The TOPO! Route window pops up.
- Left-click on Build Profile. The waypoints list at the bottom of the screen is replaced by the elevation profile.
- To get the average grade, left click on the little magnifying glass icon at the very corner of the lower right-hand side of the screen for the elevation profile. Two panes will appear.
- In the left-hand pane, move the red vertical lines until there is one at the beginning and one at the end of the hike. Read off the Avg. Grade value at the lower right-hand corner of the screen.
Determine Distance Along the Track – NG TOPO (PC)
Steps:
-
- Right-click on the track. The TOPO! Route window pops up.
- Left-click on Build Profile. The waypoints list at the bottom of the screen is replaced by the elevation profile. Distances along the track from the starting point are listed along the x-axis from left to right.
- Move the cursor into the elevation profile area. The cursor turns into a yellow cross-hairs.
- Move the cursor along the elevation profile to a waypoint and left click. Note that the map of the track centers on that waypoint. The distance of that waypoint from the starting point is shown at the lower left of the elevation profile in yellow (also highlighted in yellow on the topo map).
Draw a Map – NG TOPO (PC)
Steps:
- Click on the red rectangle with the arrow to the right. A red rectangle with an X in the middle appears superimposed on the topo.
- If you move the cursor to the middle of the X, you’ll see whatever tool you have turn into a double arrow shape.
- Move the entire red rectangle by dragging the double arrow shape.
- If you move the cursor near one of the sides of the red rectangle, the cursor turns into an two-sided arrow. You can move the boundary in either direction by right clicking then dragging the boundary in the direction you want.
- Make the area inside the red rectangle large enough to include all of the track & waypoints, plus some left over (since you’ll be cropping the image). The height to width ratio you want to end up with is either 4:3 or 3:4.
- Look at the right-hand side of the screen. It should show an Export Area.
- Left click on the floppy disk symbol to save the image on your hard drive.
- Left click Save Map, choose where to save it, and name the file.
- Left click the Save button.
- Edit the map image to 600 x 800 pixels in an image editing program, and save it to a file size no greater than 300 KB.
Return to Contents
DeLorme North America Topo (PC)
The instructions written below are based on functionality in version 9.0.
This software is no longer being sold in retail stores, though the 10.0 version could be purchased on Ebay (as of 6/19, anyway).
[Last Update: June 2019]A nice feature of this software is that you can undo actions — look for the curvy arrows next to the Tools box.
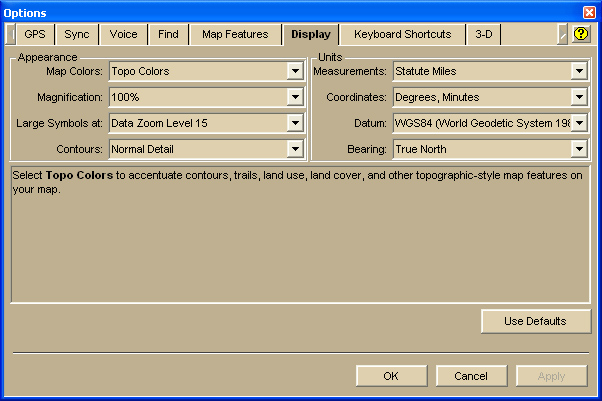
Setup – DeLorme (PC)
Steps:
-
- Locate the Options button near the upper-right-hand side of the screen.
- For Map Features, use the defaults unless they make the map look too busy. Some you can uncheck are Points of Interest, Business Points of Interest, and Game Management Units. Land Cover creates a green background for forested areas and a tan background for badlands areas, so leave that one checked.
- Note that the color coding of the publicly managed lands displayed
in the Legend isn’t correct. The color coding and land ownership boundaries that agreed with the BLM maps in 2010 is:
Private – white/beige
BLM – yellowish tan
State – violet
Indian reservation – orangey tan
National forest – green - For Display, choose the following:
If the contours on the map aren’t well defined, increase the level of detail to High Detail. Click Apply, then OK.
-
- Set the waypoint label font size:
- Click on the Draw tab.
- Choose the Waypoint tool (such as a pushpin).
- Select Arial Bold, and a font size (try 16 to start).
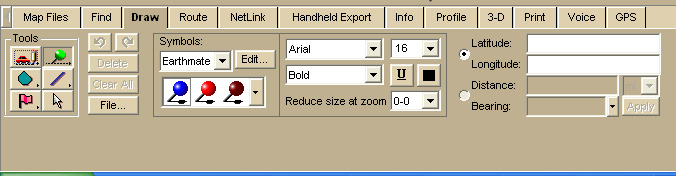
- Set the waypoint label font size:
Import GPS Data – DeLorme (PC)
To import data, start at the Route tab (also handles files containing waypoints and tracks) and import a .gpx file.
Steps:
- Click on the Route tab.
- Click on File.
- Select Import.
- Choose the file from your hard drive.
Edit a Waypoint Label – DeLorme (PC)
Steps:
- Right click on the waypoint.
- Move the cursor to Manage Draw then to Edit Draw Object Text and left click.
- Select the text of the label and type in your different text.
- Press Enter.
Use Text Labels for Waypoints – DeLorme (PC)
DeLorme does not display waypoint labels that would overlap. One way around this is to use a text label and place it at a convenient location near the waypoint whose label isn’t shown.
Steps:
- Zoom in/out until you find a good Photo Zoom level for the map. Write down the value.
- Determine the waypoints whose labels aren’t displaying on the map at this zoom level, and write down the text for the labels.
- In the Tools box, click and hold on the symbol in the lower left corner of the box (usually it’s a red flag).
- From the options that come up, choose the letter T (for text).
- Click on the topo map where you want the new text label to start. If the placement isn’t right, you’ll have to delete the text label through Manage Draw and start over again.
- Type the text of the label (all caps). It will appear in the same font that you have selected for the waypoint labels.
It may take a few tries to get the text label placement right so that all of the added text labels display.
Delete a Waypoint – DeLorme (PC)
Steps:
- Right click on the waypoint.
- Move the cursor to Manage Draw then to Delete Draw Object and left click.
Add a Waypoint – DeLorme (PC)
Steps:
- Left click on the Draw tab.
- Left click on the pushpin Waypoint symbol in Tools.
- Position the cursor where you want to add the waypoint, and left click. A waypoint is created.
- Fill in the label with your waypoint name.
List Waypoints with Data – DeLorme (PC)
The waypoints in the hike description Waypoints list are expected to be in the following format:
Steps:
- Left click on the Draw tab.
- Left click on the File button.
- Select the line that says Waypoints.
- Go to the lower right-hand side of the screen, and press the Export button.
- For Save as type, choose Text File.
- For Coords, choose Degrees, Minutes.
- Name the file and save it on your hard drive.
- Click the Done button to return to the default screen.
Here is an example of an unedited list of waypoints from the Aldridge Petroglyphs hike exported from DeLorme Topo.
N34° 42.943439′,W107° 55.629330′,PARK,BLUE MAP PIN
N34° 42.884538′,W107° 56.676807′,SPLIT,BLUE MAP PIN
N34° 42.884002′,W107° 57.244999′,PANELS,BLUE MAP PIN
N34° 43.181942′,W107° 57.521074′,RUINS,BLUE MAP PIN
N34° 44.207726′,W107° 55.690391′,ROAD Y,BLUE MAP PIN
N34° 46.794233′,W107° 56.348877′,DIRT ROAD,BLUE MAP PIN
N34° 42.888079′,W107° 56.244736′,RANCH,BLUE MAP PIN
N34° 43.475997′,W107° 58.564997′,SHORTCUT,BLUE MAP PIN
END
You’ll need to delete the extraneous information.
Draw a Track – DeLorme (PC)
Steps:
- Click on the diagonal line symbol in Tools.
- Adjust the color, style, and width of the line you want to draw.
- To draw a line, left click and hold the mouse button down as you move the mouse. When you’ve finished drawing, release the mouse button.
- Click on another symbol to turn off drawing a line.
You now have a draw object that you can edit like any other draw object.
Split a Track – DeLorme (PC)
You can split a track into two or more pieces, and delete the pieces you don’t want. The steps are written for only one split.
Steps:
Get the portion of the track you want to save
-
- Locate the point at which you want to split the track. This may be at the turn-around point for an in-out hike, or a waypoint or trackpoint on a loop hike.
- With Draw and the Select tool (white arrow) selected, click on the point. Usually a reminder window pops up telling you that you can use Ctrl – B to break a track.
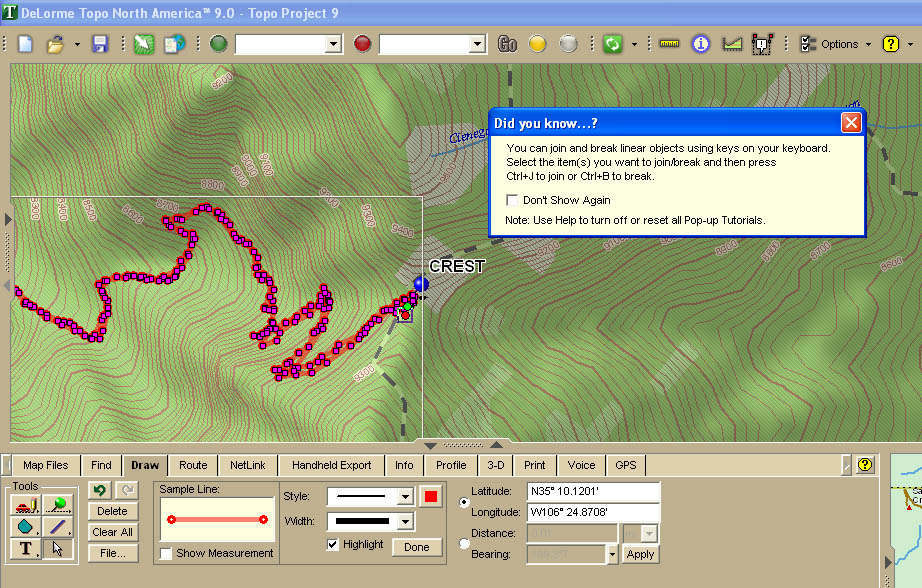
- Press Ctrl – B on your keyboard.
- With Draw selected, click on the Files button. You should see the number of tracks increased to 2.
- Click on the track you want to delete. It should be highlighted on the topo map.
- Right click, choose Manage Draw, and Delete Draw Object.
The number of tracks should be back to 1.
Verify the direction of the saved portion
- Build the elevation profile to see which direction you saved.
- If the saved track goes in the desired direction, you’re through.
- If the saved track doesn’t go in the desired direction, you’ll need to reverse the track. (The best bet is to use Reverse a Track – GPSBabel.)
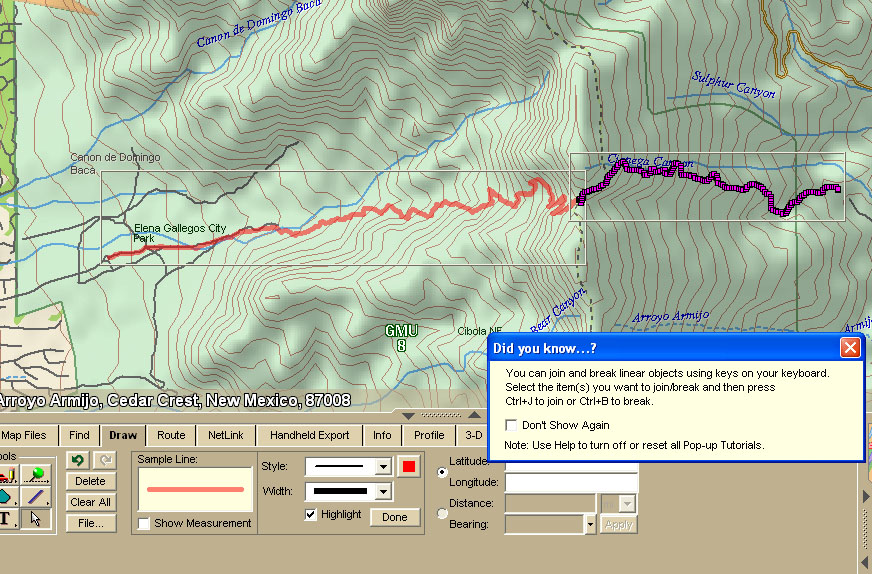
Join Tracks – DeLorme (PC)
The example we’ll use is joining part of an existing track to a track that you draw (in this case, the Pino Trail going up joined with the La Cienega Trail going down that is shown in DeLorme). DeLorme joins linear objects, so you’ll have to use the Draw Layer for the existing track portion.
Steps:
Get the existing track portion into the Draw Layer.
- Click on the Draw tab.
- Choose the Select tool (white arrow).
- Left click on the track, right click, then choose Manage Draw → Copy to Active Draw Layer.
- Click on the File button (just to the right of the Select tool). There will be three names listed (draw layer, waypoints, track).
- Uncheck the track entry. You should see a solid line drawn in the active draw layer for the track and push pins for waypoints.
Draw the new track portions and join them to the original track
-
- Zoom in enough to see curves in the trail as shown on the
DeLorme topo. - Follow the instructions for Draw a Track – DeLorme. Draw in
the same direction the original track goes. You can join multiple
tracks to the first one, so don’t worry if you have to let up on the
mouse to move the map on the screen. - Zoom out enough so that all of the track pieces show up at the same time.
- Click on Select (the white arrow) in the Tools box.
- Draw a box that includes the pieces of track that you want to join.
- Zoom in enough to see curves in the trail as shown on the
- Press the Ctrl and J keys on your keyboard at the same time to join the tracks.
- Click on the track, Manage Draw → Create Profile. You should see a profile of the entire track.
- To save, copy the Draw Layer to a Track Layer. Then you can save the track you’ve created to a .gpx file.
Clean a Track – DeLorme (PC)
You might have recorded trackpoints that you don’t want to keep in the finished track. You can delete those trackpoints.
Steps:
- Left click on the arrow in Tools.
- Left click on the track. Individual trackpoints will be displayed in pink.
- To move a point, left click on a point and drag it to the desired position.
- To delete a point, left click on a point and press the Delete key on the keyboard.
Return Elevation Data to a Track (PC)
DeLorme doesn’t need elevation data to be in a track — the software contains DEM elevation data and can restore the elevation data if it is missing from the .gpx file.
Steps:
- Import the track into DeLorme.
- Click on the Draw tab, and Files.
- Left click on the track to select it.
- Click on the Export button on the right-hand side of the screen.
- Save the track on your hard drive. The elevation data (as well as some other data fields) will be restored to the file.
Draw an Elevation Profile and Determine Maximum and Minimum Elevations – DeLorme (PC)
Steps:
- Right click on the track.
- Left click on Profile (the last item in the drop-down menu).
- The elevation profile is displayed at the bottom of the screen.
- Left click on the upper border of the elevation information and drag upwards to expand the information shown.
- Read off the maximum and minimum elevations from the table.
Determine Total Uphill/Downhill – DeLorme (PC)
Steps:
- Draw the Profile.
- Read off the Climb Elev. value from the table. This is DeLorme’s calculation of total uphill.
Determine Average Grade – DeLorme (PC)
Steps:
- Draw the Profile.
- Read off the Avg Grade value from the table.
Determine Distance Along the Track – DeLorme (PC)
Steps:
- Draw the Profile.
- Move the cursor (a white arrow) to the lower left of the profile (the starting location for the track).
- Move the cursor along the track until the x-ball lines up with one of the waypoints. The waypoint name will be displayed at the far left of the topo map.
- Record the waypoint distance. If the distance is less than one mile, the units will be feet, and you’ll need to convert to tenths of a mile (divide the distance in feet by 5280 feet per mile).
- Repeat for the remaining waypoints.
Draw a Map – DeLorme (PC)
Steps:
Start
- To import a waytrack file, click on the Route tab, then the File button just below it, then Import.
- Select the file from your hard drive. The waytrack will show up on the topo map.
Adjust the position and size of the image.
- You can center the waytrack area on the screen by moving the cursor to an edge of the map until the cursor turns into a hand, then click and drag the map on the screen.
- On the upper-right-hand side of the screen, locate the Data Zoom area. Click on the lower of the two boxes to zoom in, and the upper of the two boxes to zoom out. (You don’t need to have access waypoints showing on the screen.)
- If the waypoint labels aren’t sized right once you’ve got the map the right size, set the waypoint label font size up or down as needed, close the file without saving, and import the file again.
Obtain a solid line drawn for the track (rather than the line with bumps for trackpoints).
- Click on the Draw tab.
- Choose the Select tool (white arrow).
- Left click on the track, right click, then choose Manage Draw → Copy to Active Draw Layer.
- Click on the File button (just to the right of the Select tool). There will be three names listed (draw layer, waypoints, track).
- Uncheck the track entry. You should see a solid line drawn in the active draw layer for the track and push pins for waypoints.
- If the track has been labeled, you’ll see the name just above the track. If you don’t see a label, you’re finished with this part. Otherwise, continue.
- Right click on the solid line, then choose Manage Draw → Edit Draw Object Text.
- Delete the text in the white box.
- Press Enter.
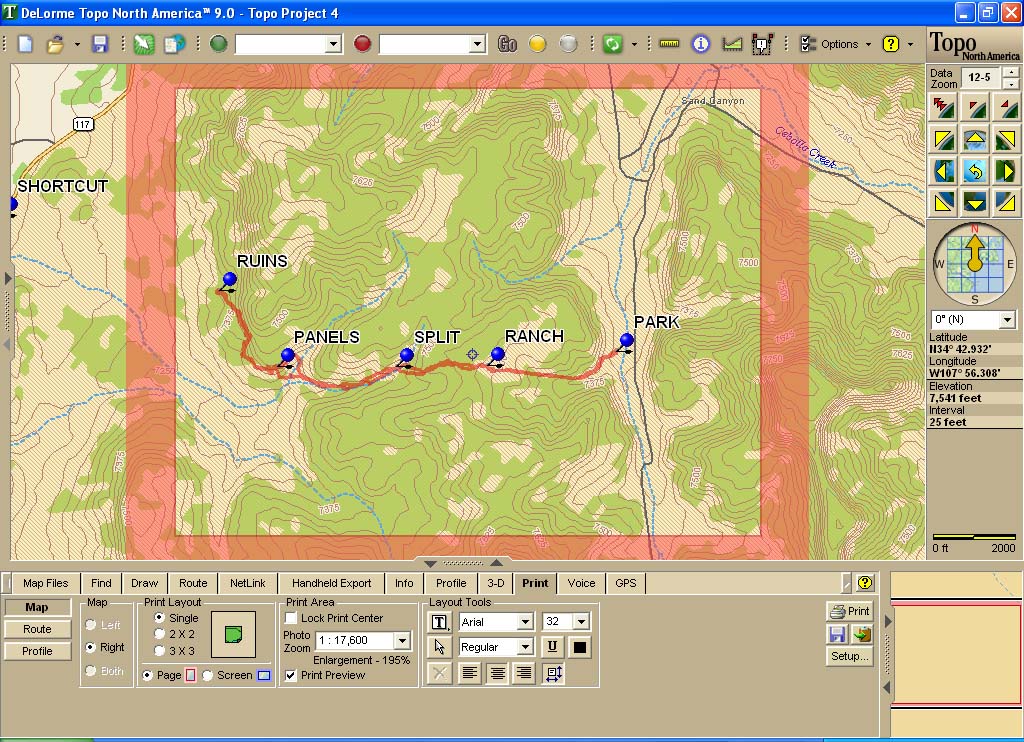
Save the map to your hard drive.
- In the lower-right-hand corner of the screen, there are two columns of small buttons. Click on Done.
- Click on the Print tab. (See the image below.)
- Check the Print Preview box. A pink border will appear on the screen around the portion that will be printed or exported to file.
- If Portrait/Landscape isn’t set correctly, look at the lower-right-hand side of the screen and click on the Setup button, and change the Orientation.
- Either use Photo Zoom or the Data Zoom feature that you used earlier to get a larger image inside the border.
- Center the image inside the border using the hand that appears at the edge of the screen to move the image within the fixed border until it is centered.
- On the lower-right-hand side of the screen, click on the Disk button.
- Choose the folder, type the name for the file, set the type to JPEG, and set the DPI to 150.
- Click the Save button.
Add a MapNote – DeLorme (PC)
MapNotes are useful for marking additional features on a map, such as trail numbers or names.
Steps:
- Place the cursor (a circle with crosshairs) where you want the pointed end of the mapnote to be located.
- Right click, and choose Add MapNote then Blank MapNote.
- Type in the text for the MapNote.
- Press Enter.
Garmin BaseCamp for PC using TOPO U.S. 24K Southwest
[Lasted Update: June 2019]Garmin BaseCamp is a free program that can be downloaded from the Garmin website. There are versions for both PC and Mac. BaseCamp is usually supplemented with a topo map product from Garmin.
The current Garmin topo map products applicable to our area are:
- Garmin TOPO U.S. 24K Southwest
- Garmin TOPO U.S. 100K
You can also use Garmin compatible maps from GPSFileDepot. (Note that these maps may not be routable or may not contain elevation data.)
The instructions and screenshots in this section are based on BaseCamp 4.7.0 for PC with Garmin TOPO U.S. 24K Southwest.
There are some nice things about BaseCamp:
- Ability to preview the result of joining tracks.
- Access to data for each trackpoint.
- An Undo option.
- Ability to easily save a reversed track.
BaseCamp is especially useful if you are recording tracks on one of the newer devices with better antennas/chips, such as Garmin GPSMap 62 or higher, and after checking the elevation profile you feel confident that the elevation data recorded in the track are accurate.
Garmin also provides a website that explains how to use Garmin BaseCamp: BaseCamp for PC – Tutorial Videos.
Setup – Garmin BaseCamp (PC)
Steps:
-
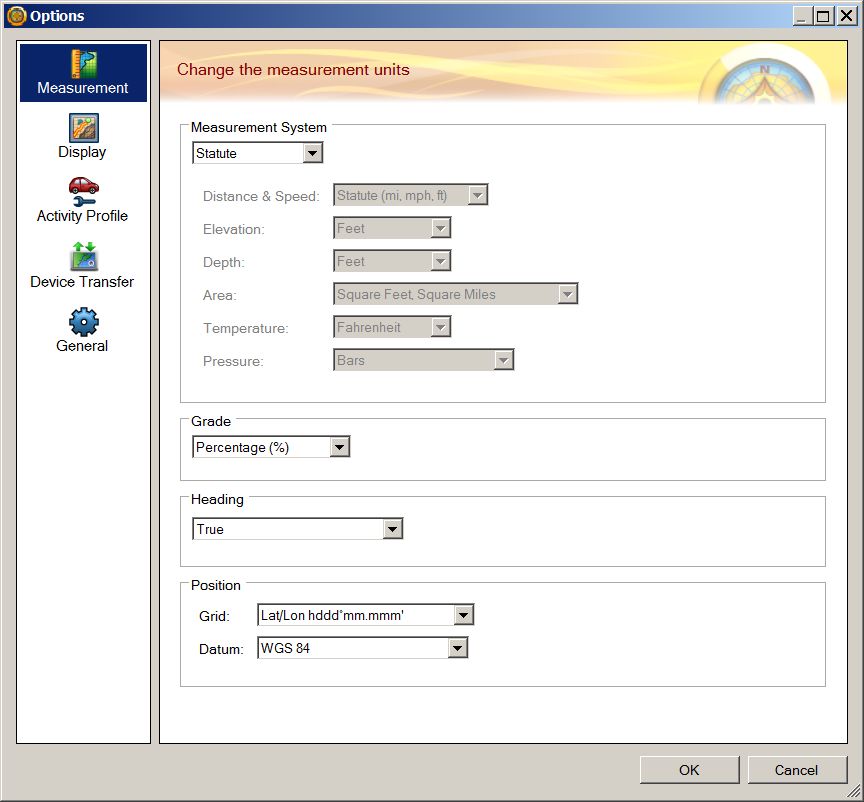
- On the top menu, left click on Edit, then Options. The following screen appears with Measurement selected.
-
-
- For Measurement System, select Statute. The program then fills in the appropriate units for a number of other parameters.
- For Grade, select Percentage.
- For Heading, select True.
- For Position → Grid, select Lat/Lon hddd° mm.mmm’ and for Position → Datum, choose WGS 84.
-
-
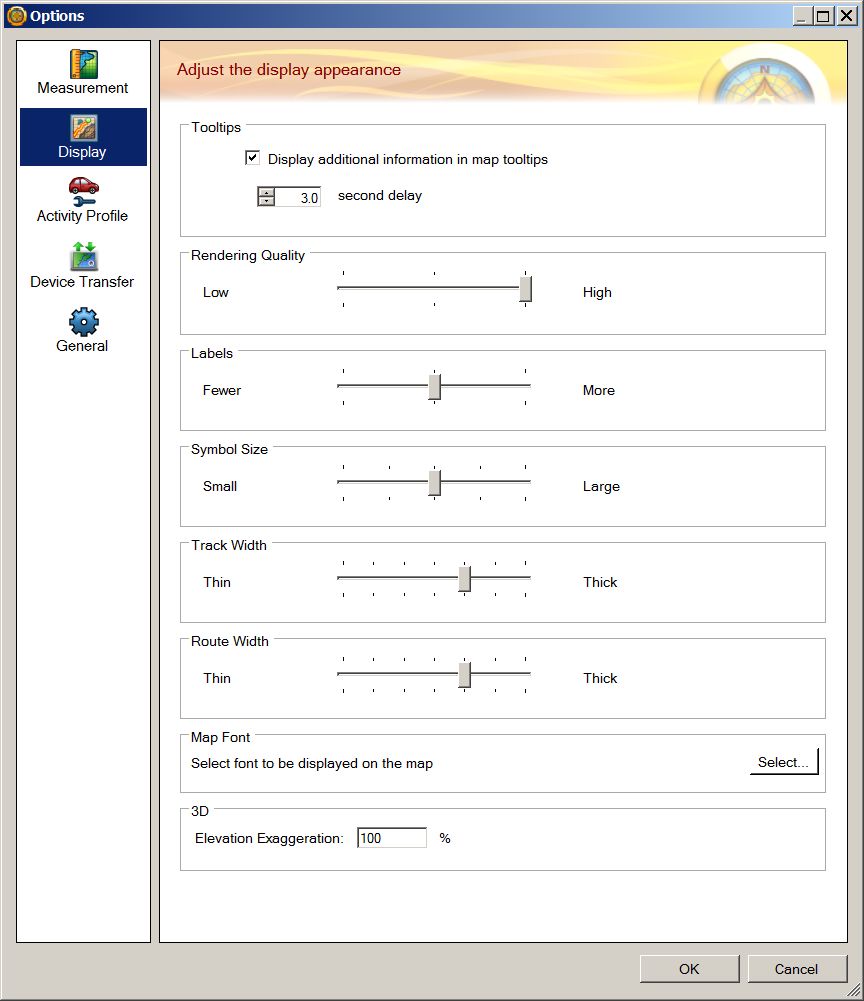
- From the same screen, click on Display. The following screen appears with Display selected.
-
-
- For Tooltips, check Display additional information in map tooltips.
- Set Rendering Quality as High.
- Set Labels half way between Fewer and More.
- Set Symbol Size half way between Small and Large.
- Set Track Width somewhere near Thick.
- To select Map Font, click on the Select button, and choose a font such as Microsoft Sans Serif or Arial, Bold, and a font size that works for the waytrack you have. You may need to increase the font for long in-out hikes. Click the OK button.
- For 3D Elevation Exaggeration, select 100%.
- Click the OK button to exit.
-
-
- From the same screen, click on Device Transfer. The following screen appears with Device Transfer selected.

-
- Select the device you will be using to connect to Garmin BaseCamp.
- If you wish, for Transferring Tracks, check Simplify tracks by removing intermediate points, and set the maximum number of points to 500. This should keep your finished tracks to 500 trackpoints or less.
It’s recommended that you create a folder (such as My Hikes) in My Documents or other directory and save your hike files there. Delete everything listed under My Collection in BaseCamp after you’ve finished (or before you start) working on a hike.
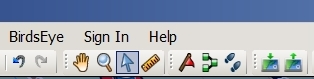
Enable Toolbars – Garmin BaseCamp (PC)
On the top menu, left click on View, then move the cursor to Toolbars. Check all of the options except for those involving Areas, Activities, or Playback. You can rearrange groups of icons by moving the cursor to the far left of a group until you see a cross shape. Then click & drag the group to where you want it to be. I’ve rearranged my set so that icons I use infrequently are to the far right. Some of the icons will be active only if a track is selected.
The icons of interest to us in creating hike descriptions are shown below.

side of toolbar):
- Topo map chosen
- Level of map detail
- Insert
- Move point
- Erase point
- Divide track
- Cut
- Copy
- Paste
- Delete
- Undo
- Redo
- Hand (Pan, move track in the window)
- Magnifying glass (Zoom)
- Arrow (Select)
- Ruler (Measure)
- New waypoint</sp
- New route
- New track
- Send to device
- Receive from device
Import GPS Data – Garmin BaseCamp (PC)
To import GPS data from a file:
- Click on My Collection, and Select File → Import.
- Select the file on your hard drive (several file types are supported, including .gpx).
BaseCamp will automatically download data from a GPS that is connected before the program starts up.
In the upper left-hand portion of the screen, choose the map product you want to use (such as Topo U.S. 24K Southwest).
Export GPS Data – Garmin BaseCamp (PC)
You may export everything shown under My Collection, or select specific waypoints and/or tracks.
Steps:
- Choose what you want to be exported (export everything in My Collection is the default).
- Left-click on the My Collection folder on the upper left-hand corner of the screen.
- Left-click on File on the left-most item on the top menu.
- Choose Export.
- If you have selected specific items, you can choose Export Selection.
- Rename the file as appropriate, and save it in a folder on your hard drive.
Set Color of Track – Garmin BaseCamp (PC)
Tracks imported into BaseCamp usually start out dark gray. To change the color, select the track by double-clicking on it. Then select the color in the small box at the upper right of the trackpoints window. (Red is the preferred color for the track in a map posted on the ASCHG website.)
Edit a Waypoint Label – Garmin BaseCamp (PC)
Steps:
- Right click on the waypoint, and choose Rename.
- Edit the waypoint name.
Delete a Waypoint – Garmin BaseCamp (PC)
Right click on the waypoint, and choose Delete.
Add a Waypoint – Garmin BaseCamp (PC)
Steps:
- On the toolbar, click on the New waypoint (flag) icon. The cursor should be a white arrow with a little box at the upper right.
- Position the tip of the white arrow where you want to create the new waypoint, and left click.
Copy a Waypoint or Track – Garmin BaseCamp (PC)
You might want to use tracks or waypoints belonging to one hike as part of another hike. To do this, first create a new list by right clicking on My Collection and choose New list. You can import existing tracks and waypoints into the New list.
To copy a waypoint or track into the New list:
- Select the waypoint or track to copy, and choose Copy.
- Select the New list, then choose Paste.
- Export the contents of the New list, which now include the additional waypoints and/or tracks.
List Waypoints with Data – Garmin BaseCamp (PC)
You’ll need to create this list one line at a time.
Steps for a single waypoint:
- Double click on the waypoint in the listing on the left-hand-side of the screen.
- Select and copy the waypoint name and paste it into a text file followed by a colon.
- Copy the coordinates and past them next to the waypoint name.
- Add a comma between the latitude and longitude values.
If you also have Garmin MapSource, you can use that program to get all of the waypoints at one time.
Steps for multiple waypoints:
- Select all of the waypoints.
- Right-click, then copy & paste into a text editor or the website data input form.
- Edit out the line starting with Symbol & Name, the duplicate waypoint name, add a colon after the waypoint name, and add a comma between the latitude and longitude values.
Draw a Track – Garmin BaseCamp (PC)
Steps:
- Left click on the Track (two footprints) icon. The cursor turns into a pencil.
- Move the cursor then left click anywhere you want a trackpoint. The software draws a straight line between trackpoints. Or, left click and hold to draw a continuous line.
- Right-click to stop drawing the track.
- Click on the hand (Pan) or arrow (Select) icons to turn off the pencil and return the cursor to normal.
Reverse a Track – Garmin BaseCamp (PC)
Using BaseCamp, you can get a .gpx file with the trackpoints in reverse order. This is helpful when creating an in-out hike track.
Steps:
- If you want to save the original track, copy it by right-clicking on the track name and choose Duplicate. A track with the original name with 001 will appear in the My Collection listing.
- Left-click on the track that you want to reverse. Right click to bring up a list of possible actions, and select Invert Selected Track. Note that the red direction arrows along the track have changed direction.
- Rename the track to reflect its new direction.
Split a Track – Garmin BaseCamp (PC)
In developing a new hike, you may need to combine parts of several different tracks. To start, you’ll need to separate the parts you want from the parts you don’t want.
Steps:
- Import the track you want to split.
- Double click on the file name next to the Track (feet) icon in the lower left of the screen. The track should be displayed on a topo map in the main window.
- In the top menu, click on the Divide icon to the right of the Eraser icon.
- Click on the track in the location where you want to split it. In the left track data window down on the bottom line, you should see a feet icon with your original track name, followed by a feet icon with the word Track. If you save your work at this point, you’ll have two separate tracks.
- Use the mouse to select the hand icon to disable the split function.

Join Tracks – Garmin BaseCamp (PC)
Steps:
- Import the tracks that you want to join. You’ll have a chance to check that you’re joining the tracks in the correct order or to reverse one of the tracks during the join process. The remaining discussion is based on two tracks.
- Click on My Collection in the upper left of the screen. Both tracks should be listed in the tracks data window.
- Left click on the first track, then hold down the Ctrl key on your keyboard and left click on the second track. Both tracks should be selected.
- Right click, then choose Join the Selected Tracks. The topo map will display the way the joined track will look if you click OK. Check
the direction of the arrows. If what you see is what you want, then click OK in the popup Join Tracks box. If you see a straight red line between the start of one track and the end of the other, you have a problem. Try reversing one of the tracks, then joining them. - You have the option to delete the original tracks or save them along with the joined track.
Clean a Track – Garmin BaseCamp (PC)
Steps for individual trackpoints:
- To look for trackpoints to delete, double click on the track to bring up the trackpoints window and see the individual track points along the track.
- Zoom in, and use the hand icon (Pan) to move the track in the window until you see a trackpoint off the expected track.
- Click on the arrow icon (Select) then on the trackpoint of interest. An orange circle should appear around the point.
- Locate the highlighted trackpoint in the trackpoints window to select it, and then press the Delete key on the keyboard.
Steps for a group of trackpoints:
- One group of trackpoints you should always delete are those registered by the GPS device during lunch. You can usually locate those with recorded times starting between 11:30 AM and noon for a 20-30 min period having recorded velocities near zero.
- To delete a group of trackpoints, select them by holding down the Shift key and clicking on the first and last of the trackpoints in the trackpoints window.
- Press the Delete key to delete all of them.
Steps:
- Double-click on the track to open the trackpoints window. Look in the Summary box for Points.
- If the number of points (trackpoints) is greater than 500, you can use BaseCamp to simplify the track.
- Click on the Filter button near the bottom left of the trackpoints window.
- Just in case something goes wrong, check the box at the bottom left hand corner of the gray popup window. A duplicate of your current track appears in the list under My Collection.
- For Filter by, check Automatic. If the number of trackpoints is much greater that 500, move the slider to the far right (More points). Otherwise, chose fewer points.
- Then click OK.
- Repeat until the number of trackpoints is 500 or less.
- You can compare the elevation profiles of the original track and the simplified one. Notice the change in the Ascent/Descent values. Simplifying the track has reduced those values.
Another way to reduce the number of trackpoints is to simplify the track using Simplify a Track – GPSBabel.
Draw an Elevation Profile – Garmin BaseCamp (PC)
Steps:
- Double click on the track to bring up the detailed Track window.
- Choose the Graph option at the top of the window to view the Elevation Profile.
You can save the Elevation Profile to post on the supplemental page of the hike description by saving a copy to the Clipboard (Alt-PrtScn) then pasting into an image editing program to crop and adjust the file size if necessary.
Add Elevation Data to Track File – Garmin BaseCamp (PC)
The default for Garmin BaseCamp is to use elevation data recorded by the GPS and to display the track using the topo map from the selected map software. You should always review the elevation profile (select Graph from the detailed Track file) to see if it makes sense. For example, an in-out hike should begin and end at the same elevation.
There are at least two cases where you’ll want to add elevation data to the track file.
First, many of the older waytrack files in the hiking database were edited to eliminate elevation data and other tagged data that weren’t needed for using National Geographic TOPO or DeLorme mapping software. If you join your track with a segment from one of these, you won’t be able to get the required hike data. To do that, Garmin BaseCamp needs a track that contains elevation data throughout.
Second, if there are a few wayward trackpoints, you can edit them out. If the elevation profile shows a lot of jagged lines, your GPS may not have received the satellite signals clearly or may be having problems interpreting them correctly. You can create a better track file by replacing this incorrect set of elevations with those from the Garmin TOPO U.S. 24K Southwest software’s Digital Elevation Model (DEM).
Here’s how to get the elevation data back into the .gpx file or replace its elevation data.
Steps:
- Import the cleaned track into Garmin BaseCamp with one of the 24K maps selected (such as Garmin TOPO U.S. 24K Southwest). (Note that topo map software downloaded from GPSFileDepot may not contain elevation data.)
- Select Edit → Advanced.
- Set Selected Track to Map Elevation. The elevation data shown now come from the digital elevation model.
- If desired, save the track with the new elevation data in it.
Determine Maximum and Minimum Elevations – Garmin BaseCamp (PC)
After cleaning the track, double click on the track to bring up the detailed Track window. Read off the Max and Min values from the Elevation box.
Determine Total Uphill/Downhill – Garmin BaseCamp (PC)
Steps:
- Clean the track to remove trackpoints that contain artificial elevation changes, such as those recorded during lunch, and filter the track down to 500 trackpoints or less.
- In the Track window, click on Properties.
- Read off the total uphill and total downhill values, which are given as ascent and descent, respectively, in the Elevation box.
Determine Average Grade – Garmin BaseCamp (PC)
Garmin BaseCamp doesn’t compute average grade the way most other mapping software programs do – if you return to the same trailhead, the average grade reported in the trackpoints window elevation box is reported near zero. So, split the track into two pieces and determine the grade for each one.
Steps:
- Split your track into two pieces. The turnaround point or lunch spot is a good choice.
- Determine the average grade for each piece (for many in-out hikes, the average grade in will be positive and the average grade back will be negative).
- Use the steepest of the two values for the value to enter on the website.
Determine Distance Along the Track – Garmin BaseCamp (PC)
Steps:
- In the detailed Track window, click on Graph to bring up the Elevation Profile.
- If you move the cursor (now a white arrow) along the profile starting at the left, a red dot with an information notice moves along the top. A hiker figure moves along the track in the main window (the one with the track shown on a topo map).
- When the hiker figure has reached a waypoint, read off and record the distance along the track to that waypoint as shown next to the dot on the Elevation Profile.
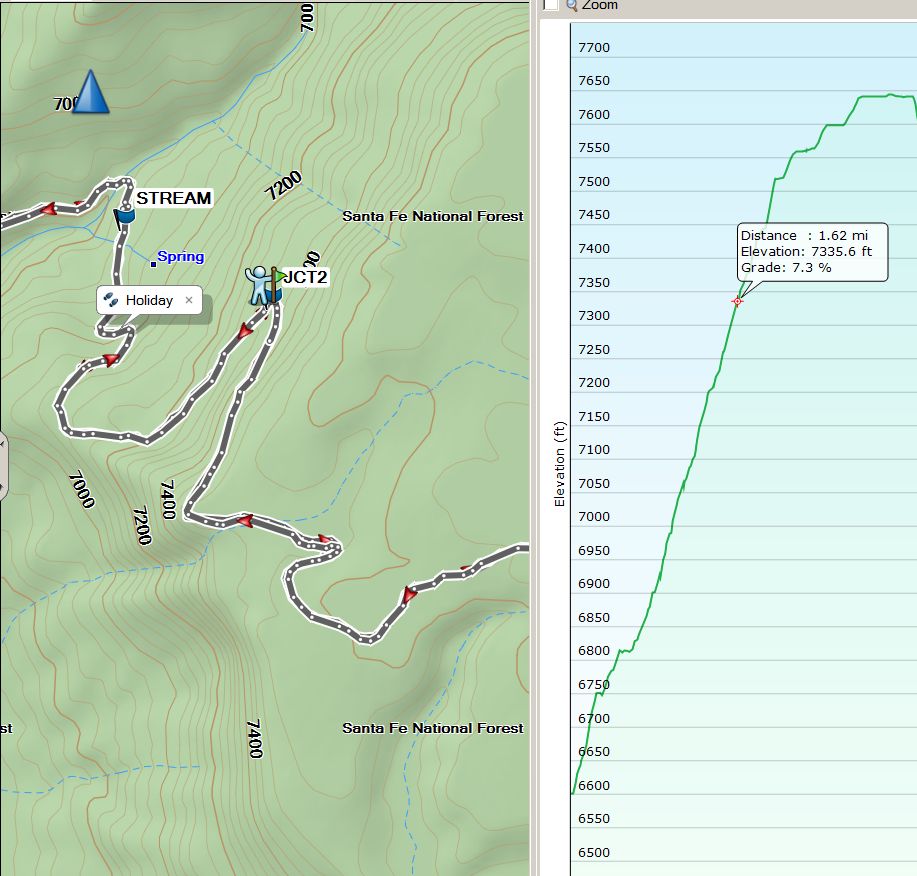
Draw a Map – Garmin BaseCamp (PC)
Steps:
- Adjust the track map until it takes up most of the available space on the screen. (Zoom in with left click; Zoom out with
right click.) (You can make the map full-screen by choosing View → Full Screen. Remember to press the F11 key to return to the previous
screen.) - Use the hand icon to move the map on the screen.
- Adjust the map detail level to remove extra stuff that interferes with your map (e.g., go from High to Medium).
- Hold down the keyboard keys Ctrl and Print Screen at the same time. This puts an image of the screen on the clipboard.
- Use an image editing software program to crop, resize, and rotate the image by 90 deg (if necessary) for the map to load onto the website.
Geotag Photos – Garmin BaseCamp (PC)
If you took photos while recording a track with your Garmin device, you can match your photos to the track. BaseCamp uses the time information from your photos and your tracks to match your photo to a specific track point. Waypoints are created automatically for each matched photo. You can also geotag your photos using the location information from your track. Note that you’ll need to use a track file that contains timestamps, such as an active log from a GPSMap 60CSx unit or the saved track from a GPSMap 62 or higher.
Steps:
- Import a track.
- Right-click on the track name. A new window comes up.
- Browse to the location on your hard drive of the photo folder, then click Next.
- In the Photo Import window, enter a Timeshift value to adjust the difference between the photo time stamps and the track time stamps (if necessary). Click Next.
- Select one or more photos taken while you recorded the track, and select Geotag Photos.
The geotagged photos appear on the map.

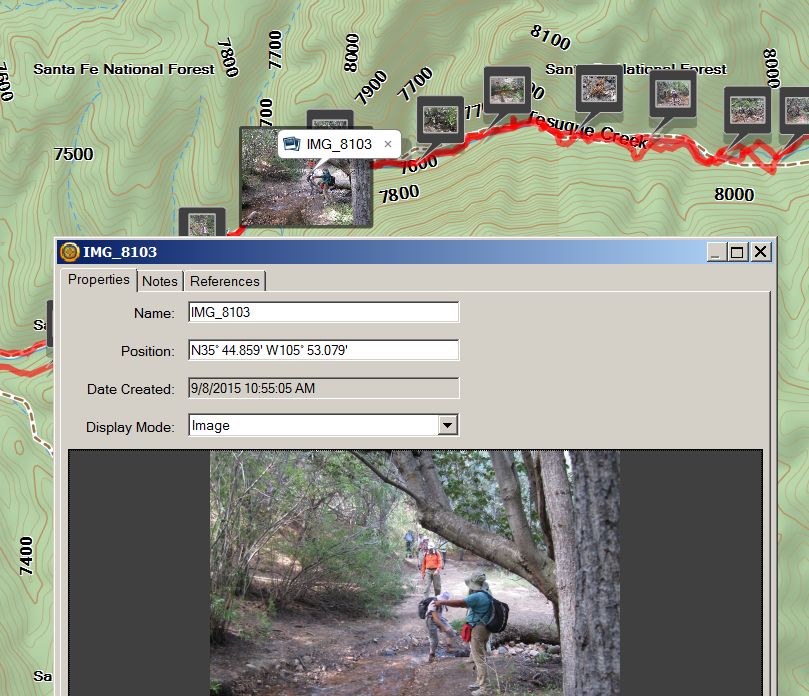
Garmin BaseCamp for Mac with TOPO U.S. 24K Southwest
There are versions for both PC and Mac. BaseCamp is usually supplemented with a topo map product from Garmin. Garmin has been updating BaseCamp several times each year, sometimes significantly changing the user interface.
The current Garmin topo map products applicable to our area are:
- Garmin TOPO U.S. 24K Southwest
- Garmin MapSource TOPO U.S. 24K Arizona/New Mexico
- Garmin TOPO U.S. 100K
The instructions and screenshots in this section are based on using a Mac OS X El Capitan Version 10.11.6 with BaseCamp Version 4.7.0 with Garmin TOPO U.S. 24K Southwest.
Tutorial videos if you need additional help:
https://www.garmin.com/en-US/learning-center/basecamp-mac
There are some nice things about BaseCamp:
- Ability to edit and draw new tracks
- Ability to join tracks
- Access to data for each track point and waypoint
- Ability to easily save a reversed track
- Ability to graph a track for an elevation profile
- An Undo option (the current version seems to have an unlimited number of undos)
BaseCamp is especially useful if you are recording tracks on one of the newer devices with better antennas/chips, such as Garmin GPSMap 62 or higher, and after checking the elevation profile you feel confident that the elevation data recorded in the track are accurate.
Screen Shot Instructions – Garmin BaseCamp (Mac)
- Hold down the keyboard keys Command + Shift + 4. Hold all at the same time, and hold until finished. A cross hairs will come up, start at upper right corner and pull downward and to the left, at an angle. Release the mouse to capture the image area you want to save. This will make a screenshot of your selected image and save it to the desktop. (You may have to set up your computer to do this automatically.)
- The computer desktop is an ideal place to save working files until you have finalized your project, then move all files into a folder as you see fit.
- If screenshot doesn’t work, try downloading Monosnap or another free application from Apple’s App Store.
Change Maps on Your GPS Unit – Garmin BaseCamp (Mac)
Select Preferences, select Transfer from top menu.
Then in the Transfer Preferences pulldown menu, choose SD card if you wanted to change the maps on the micro SD card in your unit. See figure below.
Setup – Garmin BaseCamp (Mac)
Steps for setting Preferences:
-
- On the top menu, left click on BaseCamp, Preferences, General.
- Set Heading to True; set Position Format to Lat/Lon hddd°mm.mmm; set Datum to WGS84. Figure below on the left.
- To change Measurement Unit, select Custom, select Advanced. A new window will come up as you see in the figure below on the right. For Distance and Speed select Statute, and select Grade as Percentage.
- Other settings may be correctly set as defaults but set as you see in the figure below on the right. To save changes, select OK in lower right corner.
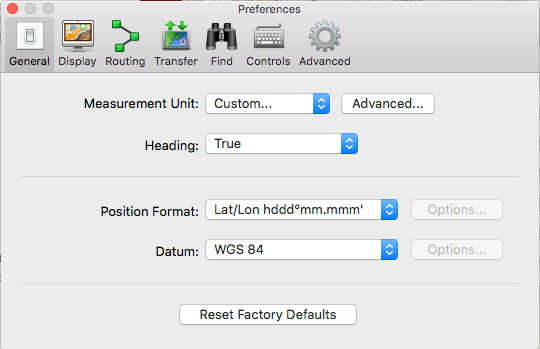
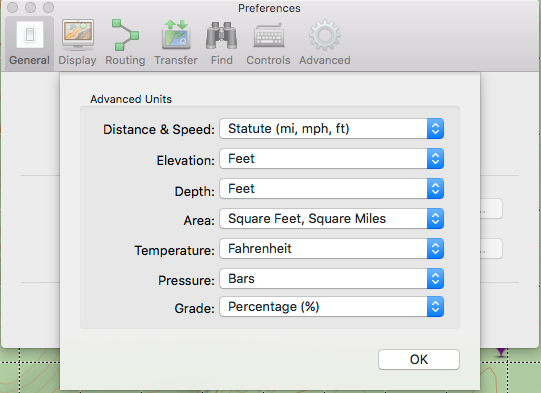
-
- From same Preference window, select Display. Some flexibility and personal preferences may apply here but start by setting sliders in the middle. See figure below as a guide.
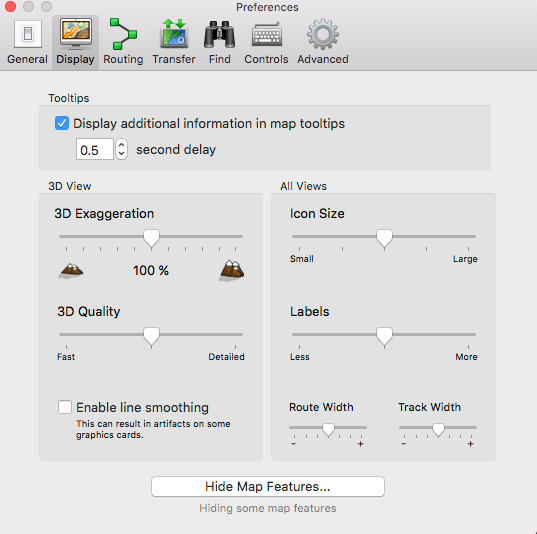
-
- From same Preference window select Routing. Again flexibility and personal preferences may apply but use the figure below as a guide.
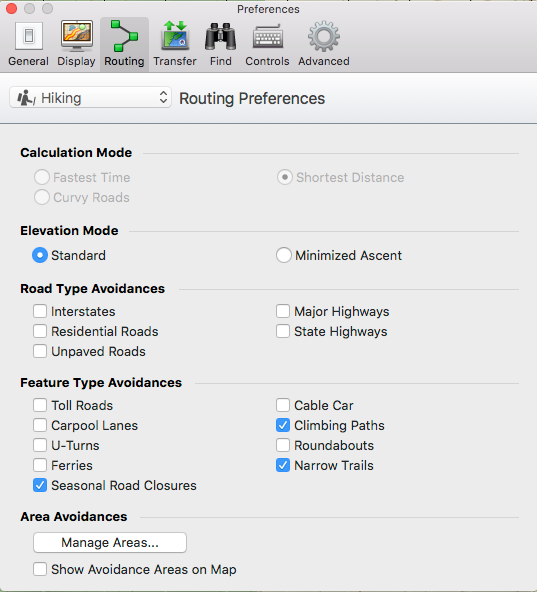
-
- From same Preference window, select Transfer. As the default, you want the Transfer Preferences menu set for your GPS unit. See below. This allows you to transfer tracks and background topo maps to your GPS unit.
- Transferring Routes, check the two boxes as displayed below even though for our purposes, we don’t use routes — only tracks.
- Transferring Tracks box offers the opportunity to filter the track automatically with a maximum of 500 points per track to your GPS device.
- For Preference window settings titled Find and Controls, use default settings unless you have a personal preference and wish to change them.
- From the same Preference window, select Advanced. See figure below. Adjust the size of your files based on amount of hard drive space on your computer. With the Library heading, you can create a specific library to store your hike files, such as My Hikes in My Documents or whatever directory you’d like. You may also save files to the computer desktop until you’ve finished working on them.
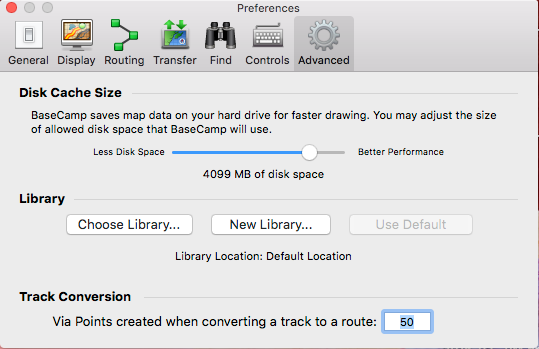
Enable Toolbars – Garmin BaseCamp (Mac)
-
- The top menu on BaseCamp will look similar to the figure below. To customize it, left click on View, when a sub menu appears, select Customize Toolbar (near bottom of menu).
-
- Customizing options: The figure below is an example of what your customizing options are. Drag items you want into the toolbar and select Done in the lower right corner to save your changes.
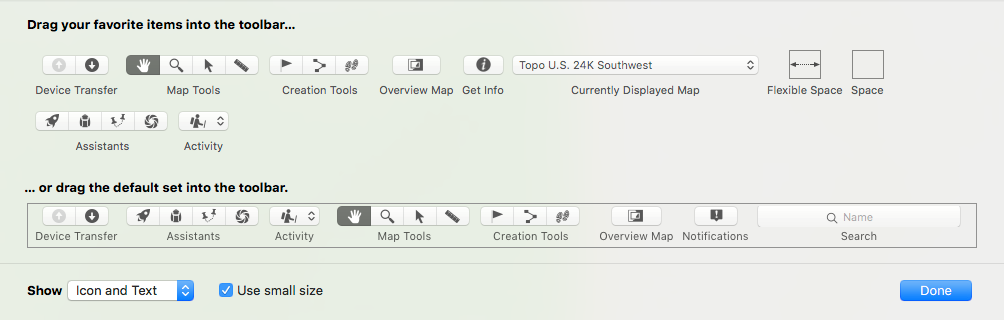
- Alternatively, you can use the default set of icons by dragging entire set into the top menu. Select Done in the lower right corner to save this change.
- In the Show box, lower left corner, make sure to select Icon and Text so when you hold the cursor over the icon, it will show the text that describes what the tool represents.
- On a MAC, the cut, paste, copy, undo, redo options are not options for inserting into the toolbar menu. You must use the Edit menu or use keyboard shortcuts.
Default Toolbar Symbols and Their Meaning – Garmin BaseCamp (Mac)
See figure above, from left to right side of toolbar:
-
- Device Transfer
- Up arrow: Send your currently selected list or folder to your Garmin GPS device.
- Down arrow: Receive your waypoints, routes, and tracks from your Garmin GPS device.
- Transfer on the main BaseCamp menu can also be used to send or receive GPX tracks from your GPS device.
- Assistants (we don’t use these for our purposes)
- Open Task Launcher
- Create a new Garmin Adventure
- Plan a trip
- Download BirdsEye Imagery
- Activity: Set for Hiking with hiker image.
- Map Tools
- Hand: Used to pan, move the track in the window.
- Zoom/Magnifying glass: Used to zoom in or out on the map.
- Selector/Black arrow: Used to select waypoints or tracks on the map.
- Measure/Ruler: Used to measure the distance between points.
- Creation Tools
- Device Transfer
![]() Waypoint: Creates a waypoint. Left click on the map.
Waypoint: Creates a waypoint. Left click on the map.
![]() Route: For our purposes, we do not use.
Route: For our purposes, we do not use.
![]() Track: Use to draw a new track.
Track: Use to draw a new track.
- Overview map: Opens the overview map.
- Notifications: Shows notifications waiting for action or notification of software up-dates.
- Get Info: Get detailed information on your currently selected item, either a track or waypoint. Also, by selecting and using the right click option.
- Currently Displayed Map: If you have multiple maps, toggle up and down to choose. For example, you may have default maps as well as maps you have purchased, such as Topo US 24K Southwest and Topo US 100K.
Import GPS Data – Garmin BaseCamp (Mac)
BaseCamp will automatically download data from a GPS unit that is connected before the program starts up or use the Device Transfer option from the Toolbar menu.
To import GPS data from a file:
-
- With BaseCamp open, under the title On My Computer, click on My Collection to highlight, go to File menu, select Import Into My Collection.
- An alternate method is select File, New List, then Import.
- Select the file on the computer desktop or find it on your hard drive. For our purposes they are .gpx files.
- To transfer a .gpx file from ASCHG.org click on the GPS File link in the hike description, and it will transfer to a download file on your hard drive or to your desktop. (Depends on how you have set up your computer for download files.) Proceed to step 1.
- For ease of use, downloading and saving .gpx files to the desktop of your computer is simpler, especially when editing and working with multiple files.
- In early versions of BaseCamp, it was difficult to work with more than one file or GPX track at a time, but with the latest BaseCamp versions, you may work with multiple files. See figure below.
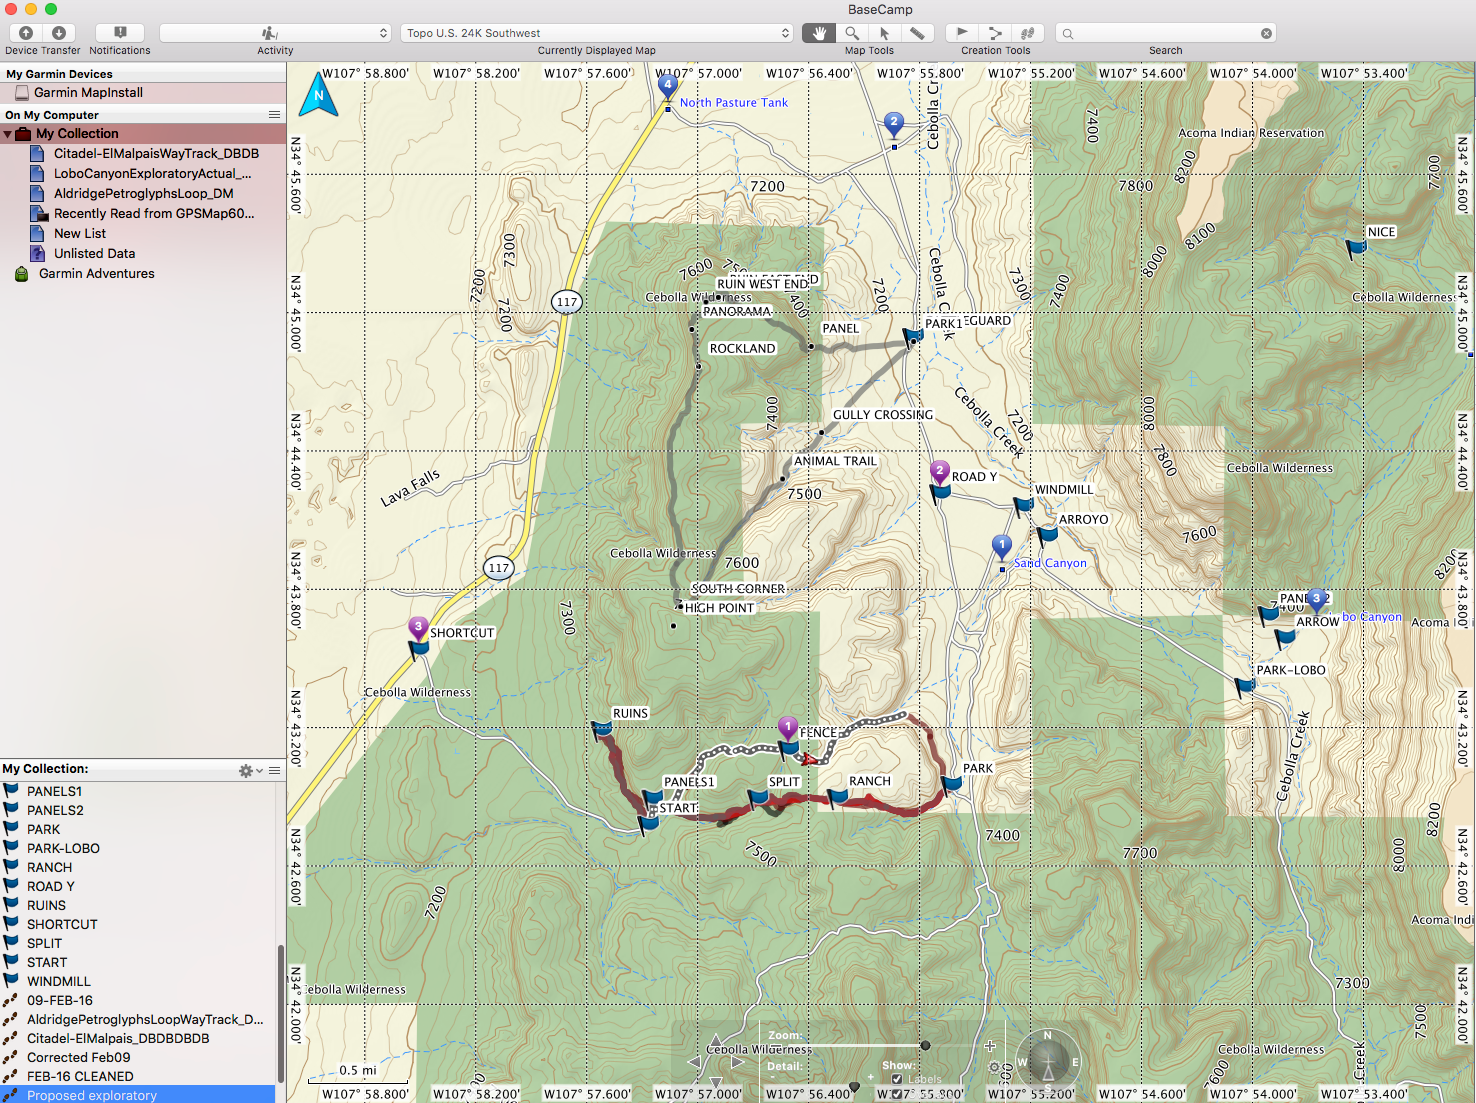
- In My Collection, you can view all the tracks listed and work in a window with all tracks visible or you may select a specific file to work with only one. Or you may switch back and forth.
- In most cases, it will be easier to work with one file at a time.
- If you have multiple tracks in My Collection, and you want to work with data for one track only, highlight the extra files you want to remove, go to File menu and select Export Selected User Data, then Rename as extra or working and send to computer desktop temporarily.
Export GPS Data – Garmin BaseCamp (Mac)
You may export everything shown under My Collection, or select specific waypoints and/or tracks.
Steps:
- Choose what you want to be exported, an individual file or all of My Collection.
- Left-click on the My Collection folder on the upper left hand corner of the screen if you choose to export all. Left-click on File on the top menu, choose Export My Collection.
- If you have selected specific items instead of all, you can choose Export Selected User Data.
- Rename the file as appropriate, and save it in a folder on your desktop or hard drive.
Show Contents on Map – Garmin BaseCamp (Mac)
For all editing purposes, there are two basic methods that apply across the board. Right click or double click, which one you choose, is personal preference.
- Right click to highlight the way point or track name (next to feet in lower left screen). When a menu opens, choose Show on Map. The track will be displayed on a topo map in the main window. Right click on the map and a menu of editing options appears.
- Double click on the way point or track name (next to feet icon in the lower left screen). In addition to the topo map with track, Summary window will open. Use the wheel in the lower left corner to make editing choices.
Edit a Waypoint Label – Garmin BaseCamp (Mac)
Steps:
- Right click on the waypoint, and choose Rename.
- Edit the waypoint name.
Delete a Waypoint – Garmin BaseCamp (Mac)
Steps:
- Right click on the waypoint, and choose Delete.
Add a Waypoint – Garmin BaseCamp (Mac)
Steps:
- On the Toolbar, click on the icon with a flag. The cursor should be a black arrow with a small blue flag to the right.
- Position the tip of the black arrow where you want to create the new waypoint, and left click.
- A window opens with General highlighted. Name the new waypoint in the Name box.
- Advanced selection in this menu box will give you exact coordinates and elevation.
- We don’t use Contact Info or References in this menu box.
- The Choose box (lower left corner) allows you to pick a different symbol besides the blue flag, but that is the standard symbol used with ASCHG Website.
Steps for adding a waypoint when you have specific coordinates for a point of interest:
- Go to Edit menu on the toolbar, select Create Waypoint at Coordinates.
- A window opens, type in the coordinates with this format, e.g. N35 30.250 W106 52.250.
- To turn off the flag and return the cursor to normal, click on the hand (Pan) or arrow (Select) icons.
Copy a Waypoint or Track – Garmin BaseCamp (Mac)
You might want to use tracks or waypoints belonging to one hike as part of another hike. To do this, first create a new list by right clicking on My Collection and choose New List. You can import existing tracks and waypoints into the New List.
Steps:
- From the menu on the lower left, select a waypoint, a list of waypoints or a track you wish to copy, when highlighted, right click, choose Copy.
- Select the New List, right click, choose Paste.
- Name your New List by highlighting, right click, then Rename.
- You can now export the contents of the renamed file, which now include the copied waypoints and/or tracks.
List Waypoints with Data to Write a Hike Description – Garmin BaseCamp (Mac)
Steps for one waypoint: There are two ways to do this, both cumbersome.
- First method is hand transcribe.
- Click on a waypoint in the lower left of the screen to highlight. Data along the bottom row shows position of coordinates and elevation.
- The copy and paste option does not work so you must hand transcribe.
- Second method uses copy and paste.
- Select waypoint, right click, and copy the waypoint name and paste it into a text file followed by a colon.
- Select Advanced in the View window, copy the coordinates and past them next to the waypoint name.
- Add a comma between the latitude and longitude values.
Here is an example of how the data should appear in the hike description.
PARK: N34 03.321, W106 46.484
Steps for a list of waypoints:
- To copy a list of waypoint names at one time, you can highlight the list of waypoints in the lower left menu by left clicking the first waypoint in the list, holding down the shift key and selecting the last waypoint. When
all are highlighted, right click, select copy, then paste into your text document. - In the text document, you will need to erase the quotation marks around each waypoint name and add a colon.
- There is no way to copy a list of coordinates without scrambling data so you must copy and paste them into your document one at a time.
- Click on the wheel in lower left menu, select View Detailed Data List.
- From this page, you can’t copy only coordinate data so left click and highlight one way point at a time, then right click, select Get Info, select Advanced, copy the coordinates and paste in your document.
- NOTE: Using the wheel on the lower left menu, you can sort the waypoints; however, it may not sort them in the order in which they appear on the track. They sort by name, by type, newest first or oldest first so if you have edited your waypoints, the order will change. In your text document, arrange them in the order they appear on the track.
Draw a Track – Garmin BaseCamp (Mac)
Steps:
- From the top menu, left click on the Track icon (two footprints). The cursor turns into an arrow with two feet.
- Move the cursor then left click anywhere you want a track point. The software draws a straight line between track points.
- If you wish to draw a track using a maps contour lines, keep clicking in small segments as you move along the contour lines. Or, left click and hold down to draw a continuous line.
- Each click will reflect a segment between two track points. See figure below.
- Right-click to stop drawing the track.
- Click on the hand (Pan) or arrow (Select) icons to turn off the footprints and return the cursor to normal. (The image below is suppose to have the two footprints at the end of the narrow line but screenshot would not capture the icon).

Reverse a Track – Garmin BaseCamp (Mac)
Using BaseCamp, you can get a .gpx file with the track points in reverse order.
Steps:
- If you want to save the original track, copy it by right clicking on the track name and choose Duplicate.
- A track with the original name followed by 001 will appear in the lower left menu.
- Left-click and highlight the track that you want to reverse.
- Right click to bring up a list of possible actions, and select Invert Track.
- Note that the red direction arrows along the track have changed direction.
- Rename the track to reflect its new direction by using a right click.
Set Color of Track – Garmin BaseCamp (Mac)
After importing a track, select the track by double-clicking on it. When Summary window opens, select the color in the small box at the bottom center of the track points window. (Red is the preferred color for the track in a map posted on the ASCHG website.)
Split a Track – Garmin BaseCamp (Mac)
Steps:
- Before editing, create a duplicate of your track file in case you need to go back or start over.
- If you make a mistake, use the Undo option from the Edit menu. (There seems to be an unlimited number of times to undo.)
- Consider adding original to the end of your file name to cut down on confusion.
- Import the track you want to split.
- Click on the track name next to the feet icon in the lower left of the screen to high-light. The track should be displayed on a topo map in the main window.
- Zoom in, right click on the track where you want the split. From the menu that comes up, select Split Track at Point. It will split the track from the track starting point to the point you selected on the track.
- You now have two tracks. In addition to the original name, a track with the original name followed by 001 will appear in the lower left menu.
- The tracks will show up as different shades.
- If you want to delete one track, left click on the track name to highlight, use the delete key OR right click, choose Delete from My Collection to completely delete the file. If you only want to delete it from a working file, but keep it in My Collection then choose a simple Delete.
- Rename by using right click to avoid confusion.
Join Tracks – Garmin BaseCamp (Mac)
Steps:
-
- Import the tracks that you want to join. Take a moment to check that the tracks you’re joining go in the same direction. If not, reverse one of the tracks.
- Click on My Collection in the upper left of the screen to highlight. Both tracks should be listed in the tracks data window at the bottom left.
- Left click on the first track, and then hold down shift key and left click on the second track. Both tracks should be highlighted.
- Right click, then choose Join Tracks. A pop up window will appear. Select Join Tracks again from this new menu. See figure below.
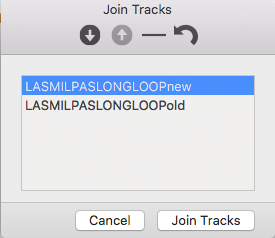
- Another pop up window will appear that gives you the option to delete the original tracks or save them along with the joined track. Delete the original tracks because it gets too confusing trying to keep rack of multiple files. If you make a mistake, the Undo option is preferred.
- If the new track looks strange, the tracks were not going in the same direction. This can be corrected by reversing the arrows in the Join Tracks box above. Use Undo and start over.
- The new track name will be followed by 001 in the lower left menu. Rename by using right click.
Clean a Track – Garmin BaseCamp (Mac)
Note: All editing features may work differently if using a full size keyboard versus a mini, particularly the delete key. If delete on main keyboard doesn’t work, try the one in the center section.
Steps for individual track points:
- Before editing, create a duplicate of your track file in case you need to go back or start over.
- To go back, use the Undo option from the Edit menu, which in the current version of BaseCamp, seems to be an unlimited number of times.
- Consider adding original to the end of your file name to avoid confusion.
- Zoom in, and use the hand icon (Pan) to move the track in the window until you see one or more track points visibly off the expected track.
- Double click method: Double click on the track point you want to remove, hit Delete key on the keyboard until you have removed all the points you wish off the track until it looks smooth. The orange circle will move along the track in the direction of the track arrow. If you go too far, go to Edit menu and select Undo. See figure below.
- Right click method: Right click on the track point you want to remove, a menu appears, choose Delete Track Point.
- In both methods, an orange circle will appear around the track point and Summary window will open.
- You can reposition the orange circle by double clicking any track point you wish to remove.

-
- One group of track points to always delete are those registered by the GPS device during lunch. You can usually locate those starting between 11:30 AM and noon for a 30 min period having recorded velocities near zero. See the dense grouping of track points in the figure below.
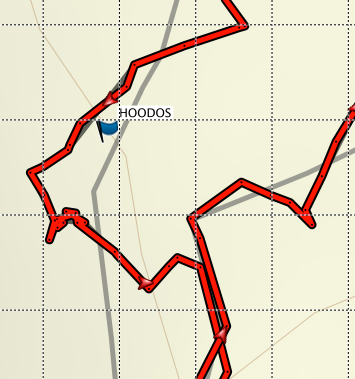
-
- At times, you may want to edit and delete an entire section of a hike. To delete a group of track points, select the first point and note the number on the Summary page, then select the last point and note the number of that. In the figure below, the first # is 119 and the last is #139.
-
- To select all the track points in between that you wish to delete, hold down the shift key, while selecting the first and last number. All will be highlighted in the Summary win-dow. Notice the track in the figure above, the selected track points have turned to orange color.
- Click the wheel in the lower left corner and choose Delete Selected Track Points.
- The figure below shows what the track looks like after you have deleted the entire section.
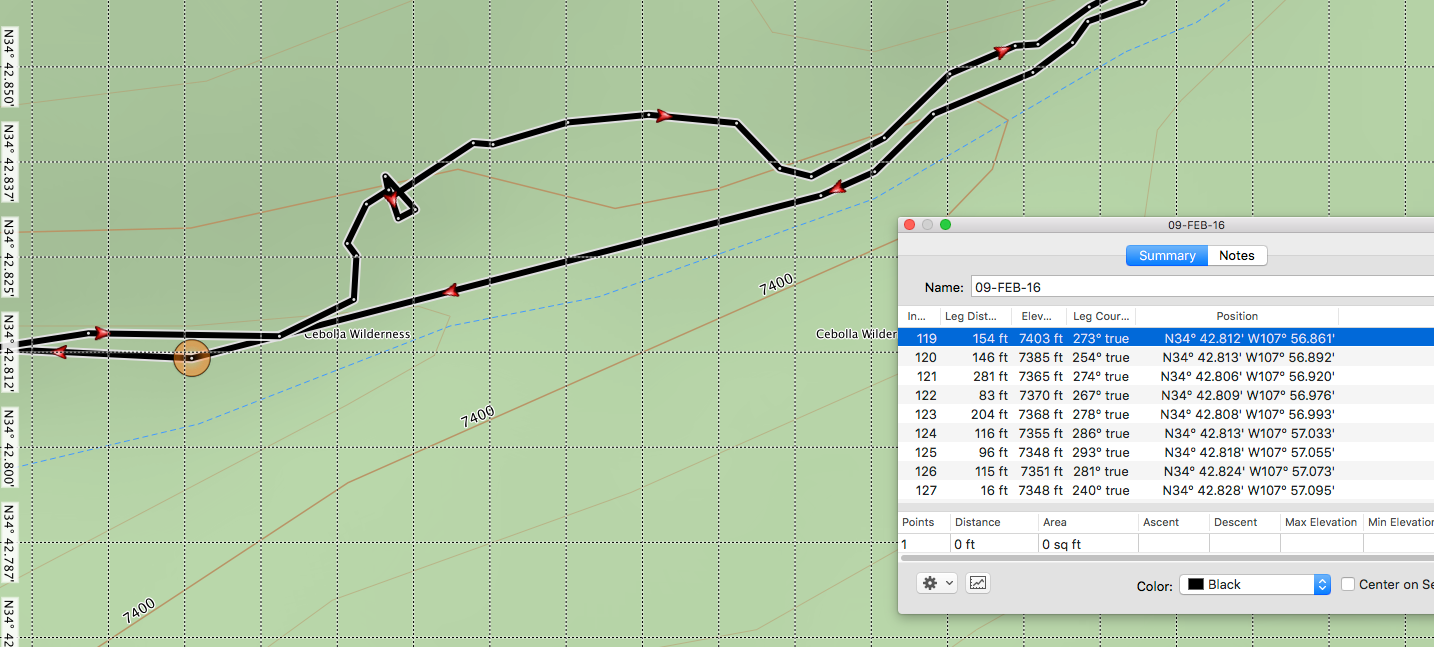
Draw an Elevation Profile – Garmin BaseCamp (Mac)
Steps:
- On the lower left menu, left click to select the track.
- Right click and choose Show Graph to view Elevation Profile or go to Summary page, click on the graph symbol in lower left corner. See figure below.
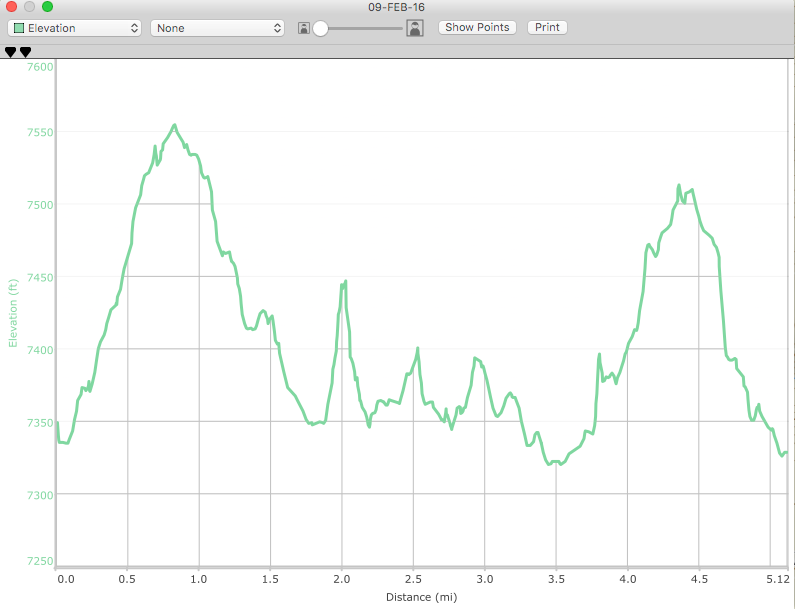
Simplify a Track – Garmin BaseCamp (Mac)
There is a setting in Preferences that should automatically adjust your tracks to less than 500 points when transferring a file to the GPS. In BaseCamp, select Preferences, select Transfer, then in Transferring Tracks check the box and set the number in the small window to 500 maximum points per track to send to your GPS device.
Steps for cleaning a track manually in case the automatic adjustment is not adequate:
You may need an additional cleaning step to reduce the number of track points to 500, remove jitter or to make it possible for hikers who have Garmin GPSMap 60CSx hand-held devices to download the track from the ASCHG website.
Steps:
- Double-click on the track on lower left menu to open the Summary window. Look in the Summary window for Points. (Far left box on bottom row.)
- If the number of points (track points) is greater than 500, you can use BaseCamp to simplify the track.
- Left click on the wheel in bottom left of the track points window. Select Filter Track.
- Just in case something goes wrong, check the box at the bottom left hand corner of the gray popup window– save original track. A duplicate of your current track appears in the list under My Collection.
- Check the following boxes: Entire Track, Automatic, and move the slider to the left (fewer points).
- Click OK.
- Repeat until the number of track points is 500 or less. If the final number is still above 500, start over with your duplicate track moving the slider one notch left.
- You can compare the elevation profiles of the original track with the simplified one. Notice how the simplified track is smoother than the original. See figure below.
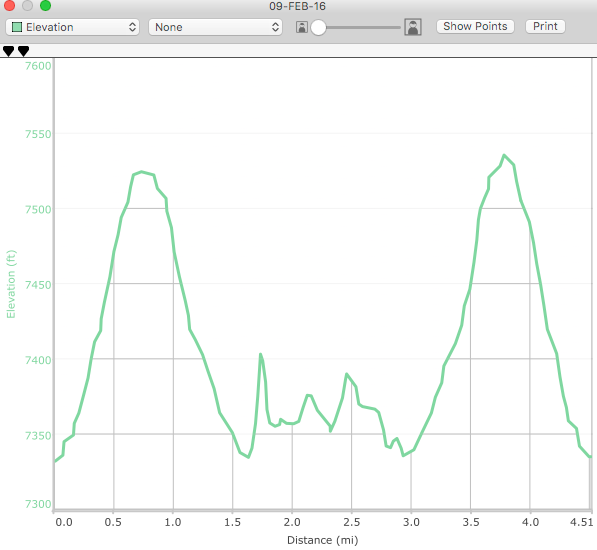
Determine Maximum and Minimum Elevations – Garmin BaseCamp (Mac)
Open the Summary window, by double clicking on the track name in lower left menu. On bottom row, read off the Max and Min Elevation values.
Determine Total Uphill/Downhill – Garmin BaseCamp (Mac)
Steps:
- Clean the track to remove track points that contain artificial elevation changes, such as those recorded during lunch, and filter the track down to 500
track points (or as close as you can get less than 500). - Highlight the track name using a left click. On the bottom row, at far left, you will find Track Points, Total Distance, Total Ascent and Descent.
- A second option, open the Summary window using a double click to highlight the track name (with feet icon) in lower left menu. Read data off the very bottom row.
Add Elevation Data to Track File – Garmin BaseCamp (Mac)
The default for Garmin BaseCamp is to use elevation data recorded by the GPS but to display the track using the topo map from the selected map software such as Topo U.S. 24K Southwest. You should always review the elevation profile (select Show Graph by right clicking on actual track or the track name in lower left menu) to see if it makes sense.
If there are a few wayward track points, you can edit them out. If the track shows a lot of jagged or zig zag lines, your GPS may not be receiving the satellite signals clearly or may be having problems interpreting them correctly.
You can create a better track file by replacing this incorrect set of elevations with those from the map software.
Steps:
- Import the track into Garmin BaseCamp with one of the 24K maps selected (such as Garmin Topo U.S. 24K Southwest). You are probably already there.
- Open Summary window by double clicking track name in lower left menu. Click wheel in bottom left corner.
- Select Set Track(s) to Map Elevation. The elevation data shown now comes from the digital elevation map (DEM) built in to the map software. If the elevation profile now makes more sense, save the revised file.
Determine Average Grade – Garmin BaseCamp (Mac)
Garmin BaseCamp doesn’t compute average grade the way most other mapping software programs do. If you have an in/out hike and return to the same trailhead, the average grade reported in the Summary window elevation box is reported near zero.
Steps:
- Split your track into two pieces. The lunch spot or halfway point is a good choice.
- Place pointer on a track point where you’d like to split the track and right click. Select Split Track at Point.
- Double click on track name in the menu at bottom left. Summary page will open. Average grade value can be read on the bottom row, far right. Determine the average grade for each piece (for many in-out hikes, the grade in will be positive and the grade back will be negative).
- Use the steepest of the two values for the value to enter on the website.
- Use Undo from the Edit menu to return GPX track to its original status.
Determine Distance along the Track – Garmin BaseCamp (Mac)
Steps:
- Open Summary window by double clicking track name in lower left menu.
- Click on the graph icon at bottom left to bring up the Elevation Profile.
- Notice two black pointers near the top left corner. The left pointer has a blue information square and the right has a red information square. Line the two pointers on top of each other at the far left edge on the line where the elevation profile begins.
- Move the top pointer to the right until you reach a waypoint. See left figure.
- An orange line appears on the track as it moves along the track in the main BaseCamp topo window. See right figure.
- When the orange line has reached a waypoint, read off and record the distance along the track to that waypoint as shown next to the square on the elevation profile.
- Repeat to find distance to additional waypoints.
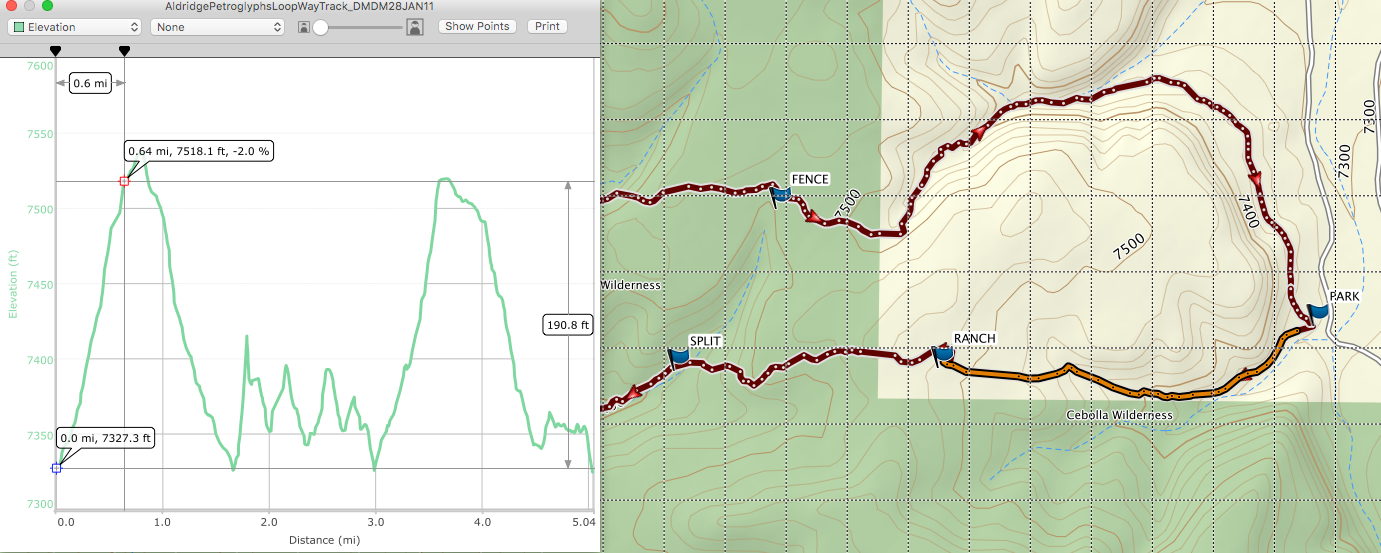
Draw a Map – Garmin BaseCamp (Mac)
Steps:
- Adjust the track map until it takes up most of the available space on the screen.
- Use the hand icon to move the map on the screen to center. Make sure the hand or other open windows are off the map image before you select.
- Hold down the keyboard keys Command + Shift + Control + 4 (at the same time). A cross hairs will come up. Start in the upper left corner and select the image you would like. This will make a screen shot of your selected image and save it to the computer desktop as a .png file. The ideal size to strive for is as close to 600 x 800 or a 4 x 3 ratio as you can manage.
- For a simple image editing project, use Preview to resize or rotate the image by 90 degrees for the map to load onto the website.
Map Editing for ASCHG – Garmin BaseCamp (Mac)
Steps:
- Find the screen shot of your map on the desktop, right click on the map image, select Open With, select Preview. The map image will appear.
- To edit, from the Toolbar select Tools, then Adjust Size.
- Set the pull down menu as follows: Fit Into: 800 x 600, check both Scale Proportionally and Resample Image. Select OK.
- In some cases, you may have to rotate the map for proper alignment on the ASCHG Web site. To do that, go to Tools and select Rotate Left.
Click OK. - Go to File, select Export. In the box labeled Export As, name the map file.
- In a pull down menu below this, choose a location to save the file. The desktop is an ideal place until you have finalized your editing, then move into a file as you see fit.
- In the Format box near the bottom, it will say PNG. Use the toggle arrows to open the menu and select JPEG.
- Quality slider will come up and File Size below that. File size maximum for maps on ASCHG Web site is 250MB so use the slider to get as close to 250 KB without going over. Select Save, and your new map will be saved as a .jpeg to the desktop with the new name.
IrfanView (PC)
IrfanView is a free image editing software program for Windows. Download IrfanView from http://www.irfanview.com/ and install it on your hard drive. You might as well also install the plug-ins appropriate for your operating system (32-bit plugins for 32-bit operating system, 64-bit plugins for 64-bit operating system). The instructions written below are based on functionality in the 64-bit version 4.52.
[Last Update: June 2019]To prepare a map to be posted on the website, you’ll need to center the track/waypoints, crop, rotate the image if necessary, and resize the image to the required file size limit.
Steps:
- Open your image file exported from mapping software or saved from GPS Visualizer.
- Go to Edit → Create Custom Crop Selection.
- Set the ratio for width:height (4:3 for landscape, 3:4 for portrait).
- Set the image size (800×600 pixels for a landscape image, 600×800 pixels for a portrait image).
- Click on the button Save and apply to image. You’ll get a box in the upper left-hand corner of the image that is sometimes very hard to see.
- Right click and hold then drag to move the location of the box.
- To expand the box, hold down the Ctrl key and at the same time left click on the lower right-hand corner of the box and drag to increase the box size proportionally.
- Combine right clicks and Ctrl-left clicks to get the box the right size and location for your map.
- To crop off the unwanted parts, go to Edit → Crop area outside of the selection.
- You’ve now got your image with a backdrop. To get rid of the backdrop, go to Edit → Auto crop borders.
- What you have now will be in the right proportions.
- The maps used on the website should be of dimensions 3:4. To rotate a map, go to Image → Rotate left.
- To save the file, go to File → Save as and move the slider for Save quality to 90.
- Move to the folder where you want to save the file, rename the file as appropriate for the website, and click on the Save button.
Return to Contents